Monday, April 30, 2012

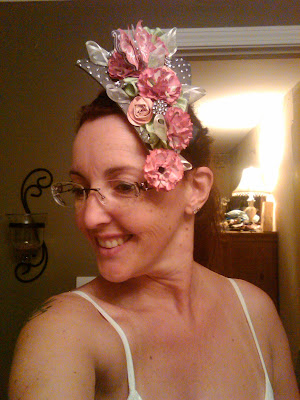
The infamous 'fascinator' - I am not sure if I have posted a picture of it or not - I know many people took photos at Extravaganza last year but here you go if you haven't seen it :O)
The base was one of the banner pieces covered in black paper which I added liquid glass 'dots' which stayed 3D when dry which I then covered with silver glitz gel.
The flowers were made from the 2" scalloped punch with black pearls in the middle - Rhinestone brads added more bling, loops of colonial white ribbon, rolled paper roses, and a stamped 3D butterly on a pin.
I then glued the whole thing to a headband and VOILA :O)

Sunday, April 29, 2012

This was the card which I made for my son Leo's 16th birthday - using the awesome 
Cruisin' Workshop on the go - he was thrilled with it and when I asked him what he thought - 
he said "its pretty darn sweet" :O) Hope you like it too :O)

Friday, April 27, 2012

 I made this adorable 'growth chart' with my friend Monica Wihongi in mind. She has the cutest little girl Maya and when I saw the cute Lucy paper and stamp set in the Workshop on the Go 
it made me think of her. 
I cut 4x12" strips of colonial white paper and then went to town with the stamping LOL - I used the totally cute Polka Dot Alphabet for the numbers and used the stamps set in the kit for the flowers and butterflies.
Silver glitz gel glue (squidgey stuff LOL) decorates the bodies of the butterflies and
Prisma Glitter and  Liquid glass is in the center of the flowers
 I loved the phrase "watch me grow' and it was the inspiration for the wall hanging. 
I designed it so that you have enough space to write the date next to the height of your little one. 
My baby girl is now 24 so doesn't need one of these and I am WAAYYY too young to be a grandma - 
so I will make these for friends instead :O)
I loved how it turned out - and I hope you do too :O)

Monday, April 23, 2012

Lucy Workshop on the Go Mini Banner

Oh my goodness I was so happy with the way this mini banner turned out - it is so stinkin' cute :O)
I used the sweet leaf wide grosgrain ribbon to thread the panels together. I made the rosettes under the letters from2 circles punched using the 2" scallop punch. I used E1019 Bohemian Alphabet to stamp the word  'Welcome', and then stamped the flowers and butterflies using the stamp set which comes in the Workshop.
I just loved the way it turned out and hope you do too :O)

Saturday, April 14, 2012

Wedding layouts

 These were the pages which I made for my friend Nancy's daughter Brittany and her new husband Derek when they got married in May last year.
I used the Bliss paper pack and added smoothie cardstock and ink for a touch of color. 
I stamped the roses and then cut around them to give a lace effect.
Cocoa ribbon added a nice touch and contrasted nicely with the Grey Flannel cardstock which I had dry embossed and sanded to give it an even softer look. 
Again I dry embossed and sanded the smoothie cardstock. I liquid glassed the roses which I had stamped and cut out. 
 I added the Bliss net flowers to these pages which were so pretty and added paper to the dimensional element heart.
I used the corner rounder to form the scallop border on these pages 
Hope you like how it turned out - both Brittany and Derek were thrilled with it :O)

Monday, April 02, 2012

Notre Dame Memory Showcase Mini Album

I have been going through some online photo albums and came across another piece of artwork which I made to teach at CTMH Extravaganza 2011.
It features the photos I took in Paris of the Notre Dame Cathedral - one of my favorite building in the world - it is absolutely stunning.
 This mini album started as the 6x6 My Creations memory Showcase album.  The first thing I had to do was to reinforce the entire album as I knew I was going to be adding a huge amount of weight which the cardstock pages weren't designed to carry. Clear packing tape and cardstock did the job !!! LOL
I used the Dreamin' Level 2 paper packed and matching stickease and lots of embellishments including the blue buttons and the wooden buttons. Bronze Glitz Gel Glue added sparkle :O)

I added 'gate fold' sections with lift up flaps. On the left hand page below I stamped the design on a Canvas Button and attached it over layered circles cut with the 2" scalloped circle punch. I used the corner rounder to make the scalloped edges of the pages. 
 
 The left hand page again has a lift up page and the right hand page below has a pocket formed behind the photo for another pull out photo.


Here you can see the 'gate fold' pages opened out. 
Here is the back of the album - quite plain in comparison with the front but I didn't feel it 
could take any more weight. 
Well I hope this inspires you to make one of your own - make sure you reinforce it if you do!!