Thursday, January 31, 2013

Pumpkin Patch Mini Album - Extravaganza 2012

I'm on a roll LOL - finally getting round to uploading all of my Extravaganza artwork 
- and about time too I hear you say !!!
 Love the True Fit File Folios - so used one to make a larger mini album than usual.
I scored it at 4 1/2" and folded up the bottom to make large pockets.
Moonlight Level 2 paper was perfect for this - and not Halloween at all.
I cut 3D flowers using the CTMH Art Philosophy Cricut Cartridge
I threaded Black and white Bakers twine from the Neutral assortment to join the 2 center sections.
 The pockets were large enough to put lots of photos inside and added Black and White Striped ribbon for more texture and Shimmer tape for some sparkle.
   I added more ribbon as pull tags for the photos and added the children's names.
I used the Smokey plum Pigment ink from the Enchantment collection and as it stays wet for longer
used it as the base to sprinkle Clear Detail Embossing powder on top and then heat set it using the craft heater. Perfect :O)
Love the True Fit File Folios - and hope you like what did made - Love Sara x

Wednesday, January 30, 2013

Don't forget - tomorrow is the last day to order !!!

Tomorrow is the last day to order any of the Workshops on the Go in the Autumn/Winter Idea Book.
They are going fast !!! 
La Belle Vie is already totally sold out - as is Stella, Pemberly & Florentine.

Click on the link below 
to view the list of all of the retiring items and order yours today :O)


Moonlight My Creations Mini Album - Extravaganza 2012

Oh my goodness - look how my boys have grown.
This My Creations Memory Showcase Album turned out EXACTLY how I wanted it to :O)
 Again I used the Moonlight paper - and this just goes to show how versatile it is.
I used the Black and white striped ribbon to accent the photos.
 Look at those little faces - I just want to kiss them  xxx
 As usual lots of Liquid glass was added to the Dimensional Shapes and Shimmer Trim
Tape added some sparkle. I also inked the Wooden Badge Buttons and then Liquid Glassed them too.
 I added the word Smile - using the Glamour Glitter Alphabet which is self adhesive.
Love my boys and LOVE this album - hope you do too - Love Sara x

Monday, January 28, 2013

Milk Carton Bird House - Extravaganza 2012


Here is my little Birdhouse - made from the Moonlight Level 2 Paper and the My Creations Milk Carton.
And its so cute - OMG !!!!!

Lots of bling as you can see and paper flowers made with the CTMH Cricut Art Philosophy cartridge.
I added Prisma Glitter to the flowers for even more sparkle :O)
I cut the circle in the center using the Coluzzle system but you could trace a circle and
cut it with a craft knife.
I used the Corner Rounder with the guard taken off to make the scalloped edges on the roof then added brads from the Slate Mini medley.
I sponged Smokey Plum into onto the Colonial White Color Ready Ribbon and tied a bow and attached it over the doorway with Liquid Glass.
I colored more ribbon with Sweet Leaf ink and tucked it around the flowers.
Rhinestone Brads added more sparkle.
I loved the way it turned out - hope you do too - Love Sara x


Saturday, January 26, 2013

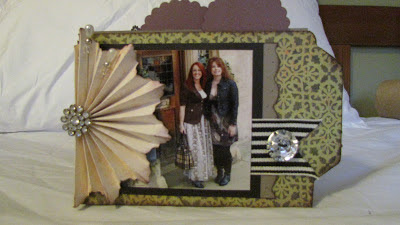
True Fit Folio Moonlight Mini Album - Extravaganza 2012


Here is the Mini album I made using the Moonlight paper and Dimensional Elements
The base is a True fit file folio which was scored to make 6" panels and then scored at 2" 5" 8" in the other direction. 
The idea in my brain was to make all of these pockets which I could fill with lots of photos and journalling and then fold up to a much smaller piece - yes well - the idea was good but in practice
not so much. The pockets were awesome and it made a 3d piece of art which was
perfect for putting on a shelf or table but not in your purse!
the embellishments and pockets full of stuff meant that it wouldn't close flat - hahaha :O)
Anyway - I loved how it turned out - it was exactly how I had pictured it when it stands on the table
and I love the fan folded piece and embellishments on the front.
Hope you love it as much as I do :O)   Love Sara x

Friday, January 25, 2013

Spooky Treat Box - Extravaganza 2012


Here is a little box made from a My Creations Block. You could you the box from the soon to be retired 
My Creations Memory Game - which would probably have been easier :O) I used a creaft knife to cut along 3 sides of the top of the block to make a lid and extended it by making the flap from cardstock.

I used the Moonlight Level 2 Paper and Dimension Elements and added the stamp set Creepy Creatures.
I accented parts of each stamped image with Liquid glass to make them shiny :O)

I cut the cobweb and spider from the CTMH Cricut Artiste cartridge.
I popped up the fence pieces using 3D Foam Tape.
I used the new Hook and Loop dots to keep the lid closed.

Hope you like it :O)   Love Sara x 

Tuesday, January 22, 2013

Stuck on You Sketch

Yes another day another challenge :O)
This is the current sketch challenge at StuckOnYou.
A very pretty card with lots of layers and scallops and embellishments - wooohooo :O)
The rules were to use scraps - and now I am really scrapin' my hoard!!
The Sonata paper has been retired for ages and I think it is soooooo pretty.
I added Chocolate cardstock which I chose an image from the Art Philosophy CTMH Cricut cartridge to the Colonial White card base (5x7.75") and then cut out a scalloped circle from the Lilac Mist cardstock (ret.) and then 2 smaller circles in Chocolate ink and in the Sonata B&T paper - 
the 2 smallest circles were popped up with the 3D foam tape.
 All of the cardstock was distressed using the Edge Distresser
The paper was ink distressed in the chocolate ink
Blush ribbon added a fun texture and mimicked the scalloped circle underneath it.
I cut the flowers still using the Art Philosophy cartridge in Lilac Mist and Blush cardstock and formed them using the new Quilling Tool. Oh how I love this new little tool - flowers are so easy with it :O)
I added pearsl to the centers of the flowers.
Lots of tiny pearls accented the circle in the center and large pearls accented 
the top right hand corner of the card.
I stamped the words Happy Birthday (from D1187 - For every Occasion)  in chocolate ink and popped it up on 2 layers of 3D foam tape. More tiny pearls were added to the edge of the My stickease decorative boarded. Another scrap of the Blush bobble ribbon finished the sentiment piece.
Finally - PRISMA GLITTER - woohooo - haven't used this for a while so added lots LOL
on the sentiment boarder and on the 3 Cricut flowers :O)
Love this card and hope you do too - Love Sara x


Monday, January 21, 2013

Retro Sketch #47 - Perfect Day


Here is the latest sketch from the challenges at the Retro Sketch Blog - and I do really like this one as it has a simpler laout - which can allow or an elegant card with lots of embellishment possibilities :0)
You know that my #1 all time favorite paper is Perfect Day (very closely following by La Belle Vie haha)
and I still have a carefully hoarded bag of scraps left over from my mammoth 3 albums
of the Mediterranean Cruise 2008.
So this is my take on the sketch - I turned the design through 90 degrees and the card is 5x7
I used Cocoa Cardstock for the base and scalloped the bottom edge using the Corner Rounder with the guard taken off, and layered Colonial White cardstock over it. 
 A strip of Juniper cardstock 1.75" x 4.5" over that and a small strip of Colonial white which was popped up with 3D foam tape after I had stamped the sentiment with Cocoa Exclusive inks.

Yes I used the Perfect Day stamp set which is retired but I love it, along with Juniper, Creme Brulee and Sorbet Exclusive Inks. The large flower base was stamped in 2nd generation Sorbet ink with the detail stamp in 1st generation Sorbet. Gotta love clear stamps from CTMH - they make 2 step stamping so easy :O)

Antique coppers brads, corner piece and large decorative brad and loops of cocoa ribbon added 
texture and embellishment and I then filled the centers of the Juniper leaves with Liquid Glass (although it is difficult to see that.
I love it and hope you do too - Love Sara x

Sunday, January 20, 2013

I won :O)

Thank you to everyone at Color My Heart for the lovely 'Color Dare - Diamond Award'.
I am the first ever winner of this award and I am thrilled - I earned it for my submission in the Ruby and Indian Corn Blue Dyadic Color Challenge you will see from last week.
And I have also been asked to be a guest designer - I am very excited - will let you know more details when this will happen - so Happy Sunday to you all - Love Sara x

Friday, January 18, 2013

Get these while they are available as they won't last long !!!


2012 Autumn/Winter Idea Book Retiring List 
(closes January 31, 2013)

Okay peeps - you have been asking me for it so here it is . . . .  the retiring items list for this year. The items are from both the Spring/Summer 2012 book and from the most recent Autumn/Winter 2012 book.  Some of the retiring items are already sold out - La Belle Vie paper and stickease are already gone :O( 
So has the Cutting knife, Stella and Florentine papers. 
I have tried to put notes on items where I know they are no longer available. If there is anything on this list you need - just click on the item and it will take you directly to my website where you can order it. This is the most efficient way to do it as you will be able to see right away whether an item is sold out or not. 
Don't wait to order, as these items will sell out very quickly and they only have a limited number of each item left x

Item # - Item Description - Page # Autumn/Winter 2012 Idea Book
Z1349 Shimmer Designer Brads 127
Z1360 Rhinestone Designer Brads 127
Z1361 Brads Red Assortment 127
Z1362 Brads Pink Assortment 127
Z1363 Brads Blue Assortment 127 - SOLD OUT
Z1364 Brads Green Assortment 127
Z1365 Brads Basic Assortment 127
Z1387 Wooden Designer Buttons 125
Z1391 Buttons Clear Assortment 125
Z1395 Irresistibles™ Eclectic Chipboard Die-Cuts (the alphabet) 130
Z1465 Irresistibles™ Make-It-Count Numbers 130
Z1681 Dimensional Elements Numbers 131
Z1761 Dimensional Elements Ornaments 131
Z1762 Dimensional Elements Snowflakes 131
Z1765 Color-Ready Arbor Wooden Shapes 130
X7147C Stella Complements Canvas Shapes 68
X7148C My Stickease® Pemberley Assortment 68
X7150C My Stickease® Victory Assortment 69
X7153C My Stickease® Florentine Assortment 69 - SOLD OUT
X7158C La Belle Vie My Stickease® Assortment 38 - SOLD OUT
X7160C Flirty Complements Dimensional Elements 50
X7161C Moonlight Complements Dimensional Elements 56
X7162C Pear & Partridge Complements Glittery Rub-Ons 62- SOLD OUT
Z1464 Milepost Shapes 128
Z1466 Bling Assortment 128
Z1695 Urban Felt Alphabet 130
Z1696 Keepsake Felt Alphabet 130
Z1709 Just Blooms® Petals Paper Flowers 129
Z1460 Foundry® Ribbon Slides 126
Z1711 Foundry® Binder Clips 126
Z1712 Foundry® Number Plates 126
Z1461 Décor Journaling Spots 129
Z1687 Bohemian Assortment 128

Z1689 Timeless Charms 128
Z1692 Tough Tags 128

Z1694 Bouquet Assortment 128
Z1741 Haunted Assortment 128
Z1749 Autumn Lane Assortment 128
Z1763 Boutique Assortment 128
Z1772 Dimensional Elements In Color—Holiday 128

Z1393 Mini-Medley Accents Black Collection 126
Z1316 Designer Ribbon Cocoa Collection 124
Z1385 Designer Ribbon Blue Collection 124
Z1615 Designer Ribbon Red Collection 124
Z1616 Designer Ribbon Green Collection 124
Z1388 Newsprint Rub-Ons 130
Z1700 Dark Chocolate Tapestry Velvet Rub-Ons 126
Z1733 Black Tapestry Velvet Rub-Ons 126
Z1743 Festive Velvet Rub-Ons 126 - SOLD OUT
Z1742 Parlor Velvet Rub-Ons 126
Z1407 6" x 6" Olive Quick Pic™ Album 122
Z1408 6" x 6" Pansy Purple Quick Pic™ Album 122
Z1054 My Creations® Display Album 132
Z1378 My Creations® Banner 132
Z1614 My Creations® Memory Game 132
Z188 Craft Jars 120 - SOLD OUT
Z1352 4 1/2" Colonial White Circle Cards 123
Z1353 4 1/2" White Daisy Circle Cards 123
Z1731 My Originals® Sweet Surprises Card Kit 123
X7148B My Reflections® Pemberley Paper Packet 68 - SOLD OUT
X7150B My Reflections® Victory Paper Packet 69
X7160B Flirty Paper Packet 50
X7161B Moonlight Paper Packet 56
X7162B Pear & Partridge Paper Packet 62

G1041 Workshops on the Go® Avonlea Cardmaking Kit 22
G1043 Workshops on the Go® Pear & Partridge Cardmaking Kit 66
G1040 Workshops on the Go® Spellbound Cricut® Kit 14
G1042 Workshops on the Go® Scroll Album Kit 23
G1044 Workshops on the Go® Advent Calendar Kit 67
G1045  Workshops on the Go® Avonlea Scrapbooking Kit 21
G1046 Workshops on the Go® Clementine Scrapbooking Kit 29
G1047 Workshops on the Go® Dakota Scrapbooking Kit 35
G1048 Workshops on the Go® La Belle Vie Scrapbooking Kit 41
G1049 Workshops on the Go® Scholastic Scrapbooking Kit 47
G1050 Workshops on the Go® Flirty Scrapbooking Kit 53
G1051 Workshops on the Go® Moonlight Scrapbooking Kit 59
G1052 Workshops on the Go® Pear & Partridge Scrapbooking Kit 65  - SOLD OUT
Item # - Item Description - Page # Spring/Summer 2012 Idea Book
A1104 A Tweet 90
A1111 A Tulip 68
A1116 A Melody 94
A1122 Bravo 92
A1128 Quick Cards—Shell 80
A1129 A Rainbow 85
B1365 Spring Up 71
B1369 Rosy Regards 67
B1374 Bee Happy 83
B1397 He Is Risen 74
C1439 Enjoy Life 95
C1440 Take a Picture 93
C1442 Tailor-Made 94
C1450 Eclectic Edges 99
C1452 Delight 71
C1455 Aspire 96
C1456 Heartfelt Treasures 68
C1457 Happy Camper 84
C1458 Paper Lantern 90
C1473 Remarkable Wreath 70
C1474 10 Things 105
C1485 Super Powers 47
C1498 Country Life 82
C1499 Perfect Day 80
D1195 The Works Alphabet 117
D1222 Tiny Typewriter Alphabet 117
D1296 Chocolate Alphabet Small 114
D1301 Hodge Podge Alphabet 114
D1303 Classmate Alphabet 114

D1462 Splendid Day 77
D1464 Card Chatter—Love 106
D1467 Trees & Things 76
D1472 Simple Memories 66
D1478 Bingo Alphabet 113
D1505 Roar! 89
D1508 Diverse Backgrounds 102
D1509 Magic Adventures 78
D1511 Kick Back 81
E1013 Field Trip Alphabet 114

Happy Shopping - Love Sara x


Thursday, January 17, 2013

40,000 views - Holy Smoke!!! Want another giveaway of artwork ??

I am stunned - speachless - gratified beyond words.
Thank you, thank you, thank you to everyone who has visited my blog and liked my artwork
and commented on my blog - 1000 hits in just over a week.

So yes I will give away some more artwork in response to you all taking time out of your day
and coming and seeing whats going on at Legacies of Love.

So comment on this post and at the beginning of next week I will create and give away
a piece of artwork to one lucky winner :O)

Wednesday, January 16, 2013

You leave an impression on me . . . .

Yes, I'm still on the card challenge kick :O)
Retro Sketches posted their latest challenge #46 - and I really liked this one - a more
simple layout but one which could be embellished. 
I really tried not to over-embellish and enjoy the simplicity of the layout :O)
 I started with the Colonial White cardstock base and then added 2" deep pieces of cardstock
These 3 pieces were dry embossed using the Medium Embossing Stylus
and then inked distressed with their matching Exclusive inks.
I used a Dimensional Element heart which I inked in Ruby Exclusive ink and then stamped in clear Versamark ink and heat embossed with the Clear Detail Embossing powder.
The flower is a retired one and I added a soon to be retired Milepost Shape and used the corrugated side up and filled the lines with Bronze Glitz gel.
I used Desert Sand and Cocoa inks to stamp the coffe cup stains and the saying - yes again - a much loved but retired stamp set.
Hope you love it as much as I do :O)   
Love Sara x

Inkspirational Challenge #2


So the color challenge at Inkspirational  this week was based on the picture below:
Red, Blue, Green with a little Yellow and flowers.
I had made a card for another challenge which I felt would (with a little more effort) fit into Inkspirational's
color challenge this week - so here is the card which I submitted.
So this is my card - I used the gorgeous stamp set from the Flirty Workshop On The Go.
This Workshop will retire at the end of this month - so if you love the limited edition stamp set that
comes in this kit - you need to move fast !

The base and sentiment piece were cut from Colonial White Cardstock.

I used the Indian Corn Blue Exclusive Ink for the sentiment and did 2nd generation stamping 
in the same color for the branches in the background. 
The sentiment was ink distressed with the same color ink.
I also sponged it onto the Color Ready Seam Binding Ribbon using the white sponge tool 
from the Texture Tools.
I pleated the ribbon when it was completely dry and kept the pleats in place with Mini Glue Dots.

I used the Ruby Exclusive ink for the 3 flowers - again the lightest flower is 2nd generation - the left hand flower I rolled the edges again so that the color would graduate and the right hand flower was stamped twice and I cut out the center section and overlaid the 1st flower using 3D foam tape to give it dimension.
All of the flowers were ink distressed using the Sponge Dauber and Ruby ink.
The centers of the flowers were colored using the Creme Brulee (light) Exclusive Marker .
The leaves were stamped in Olive Exclusive ink. cut out and tucked around the flowers.

The sentiment was matted on Ruby cardstock which again was ink distressed and given height 
using 3D foam tape.
I used Liquid Glass on all of the buds on the branches and then scattered bitty pearls.
I used the medium sized Cream Pearls on the sentiment and the large ones on the ribbon.on the ribbon.
Finally 2 Pins from the soon to be retired Bling Assortment completed it.

So two challenges with similar cards and additional colors - hope you like it :O) 
Love Sara x


Tuesday, January 15, 2013

Color My Heart Card #25

I'm not sure how I managed to find the link to this blog/competition but I am very glad I did.
Challenge #25 asked us to use a Dyadic color scheme  - 
A Dyadic color scheme is 2 colors which are 2 colors apart on the color wheel. 
The 2 colors we were given to play with were Ruby and Indian Corn Blue.

I have to admit that this was a little intimidating as the 1st thoughts that come to mind when putting these two colors together is Patriotic & July 4th .
I really didn't want to go along that route of design as it seemed too obvious.
So this is my card - I used the gorgeous stamp set from the Flirty Workshop On The Go.
This Workshop will retire at the end of this month - so if you love the limited edition stamp set that
comes in this kit - you need to move fast !

The base and sentiment piece were cut from Colonial White Cardstock.

I used the Indian Corn Blue Exclusive Ink for the sentiment and did 2nd generation stamping 
in the same color for the branches in the background. 
The sentiment was ink distressed with the same color ink.
I also sponged it onto the Color Ready Seam Binding Ribbon using the white sponge tool 
from the Texture Tools.
I pleated the ribbon when it was completely dry and kept the pleats in place with Mini Glue Dots.

I used the Ruby Exclusive ink for the 3 flowers - again the lightest flower is 2nd generation - the left hand flower I rolled the edges again so that the color would graduate and the right hand flower was stamped twice and I cut out the center section and overlaid the 1st flower using 3D foam tape to give it dimension.
All of the flowers were ink distressed using the Sponge Dauber and Ruby ink.

The sentiment was matted on Ruby cardstock which again was ink distressed and given height 
using 3D foam tape.
I used Liquid Glass on all of the buds on the branches and then scattered bitty pearls.
I used the medium sized Cream Pearls on the sentiment and the large ones on the ribbon.on the ribbon.
Finally 2 Pins from the soon to be retired Bling Assortment completed it.
I love the way it turned out and hope you do too
Love Sara x

Monday, January 14, 2013

Mason's baby shower card.

Oh this monkey melts my heart - Yes I KNOW !!! This is a very retired set from many years ago but that is such a stinkin' cute monkey I had to keep him :O)
And he was just perfect for a Baby Shower card which I made for my friend Jen whose little boy Mason is due in 5 weeks.
I used Sky cardstock for the base and cut a piece 4.25 x 3" and dry embossed and then heavily ink distressed in Sky Exclusive ink.
I used the Congratulations stamp - inked in Sky ink -  and added an antique copper brad next to the words New Baby.
I stamped the money and the word Mason in Chocolate ink then used the waterbrush and chocolate and desert sand ink to color in the monkey's face and his fingers. I used the Blush (light) exclusive Ink Marker for his ears and mouth.
Brown sparkles for his eyes and in the middle of some pale blue buttons and to accent his name and then liquid glass for his eyes and over the letters of his name for some glossy accents and a piece of wide pale blue shimmery ribbon finished it off :O)
Hope you like it as much as Mason's mama did.-

Love Sara x

Friday, January 11, 2013

Stuck On U Sketch - La Belle Vie

                                               
I found another sketch site and decided that I loved this layout for a card.
As you also know - La Belle Vie paper is my absolute favorite &19 level 2 paper packs can hardly be enough for any sane scrapbooker - I am stockpiling it as it will retire at the end of January and I have a huge scrapbook to make from my trip to Paris :O)

Anyway - I decided that I could spare some scraps for a card & I raided my stash of paper,
 & added some Cruicut images from the CTMH Artiste cartridge (page 56 of the booklet).
I stamped the vintage writing and floral stamp from Jardin stamp set in Smokey Plum Exclusive ink
 on 3 of the Cricut pieces, I used the Dots background stamp from Diverse Backgrounds in
 Blush Exclusive Ink on 2 of the pieces, & on the last piece I used Sweet leaf cardstock 
 stamped in Pear Exclusive Ink using the floral & swirl stamp - again from Diverse backgrounds.
I stamped the frame from Jardin in Desert Sand Exclusive ink - and also distressed all pieces with the Desert Sand ink and the sponge from the Texture Tool set.
I raised the frame up on 3D foam tape after I had matted it on Black cardstock from 
Scraps of the now retired Sweet Leaf ribbon and then the Petals Paper flowers 
sponged in Smokey Plum  and Blush inks added softness to the edges of the frame.
I then added Liquid glass to the frame and to the blush colored paper flowers.
Bitty Sparkles were added to 3 of the Cruicut pieces & to the center of a Black Button Brad from the Black Mini Medley.
Needless to say - I love this card and hope you do too :O)
Love Sara x

Thursday, January 10, 2013

Event Calendar featuring the December 2012 SOTM


This is the Event calendar which I made using the December Stamp of the month which was so popular last month.
I used the beautiful Pemberly paper which is perfect for family occasions as the blues are more masculine and the flowers add a feminine touch.
I embellished with Milepost shapes, Silver Glitz Glue, Liquid glass, Colonial White waxy flax and Blue Sparkles.
I hope I have given you some inspiration for using this cute stamp set which is perfect for all year round occasions :O)
Love Sara x

Wednesday, January 09, 2013

Retro Sketch Challenge Card - Would you like to win it ??


I thought this was such a fun sketch and one that was easy to make with all sorts of different images.
I decided to use the You and Me stamp set which yes I know is retired but it is one of my all time favorites.
This was my version of the sketch and I am thrilled with it - it's very ME !!
I cut a standard card ( 4.25"x 5.5" ) from Colonial White cardstock and distressed the edges using 
I used stamped the 2 swirl patterns using the Versamark Ink pad and then heat set the 
I stamped the Journalling area in Cocoa Exclusive Ink
I used Juniper cardstock for the larger ribbon piece and stamped the floral & swirl images using Diverse Backgrounds in Juniper Exclusive Ink..
I know it is difficult to see but I stamped circles of dots from the Love Life stamp set on the Creme Brulee cardstock using Creme Brulee Exclusive Ink.
I used one of the Milepost shape stars and inked the flat side of it using Ruby Exclusive Ink &  
then made it glossy with Liquid Glass.
I embossed the heart shape from the Love Life stamp set again in Cocoa Embossing Powder 
& colored the swirls using the Creme Brulee Exclusive Markers. 
I used the Ruby Exclusive Marker to color in the tiny dots next to the swirls & then added 
liquid glass over the top.

Hope you love it as much as I do - make sure you leave a comment & one person will be chosen 
from the list & will receive this card from me :O)
Love Sara x

Tuesday, January 08, 2013

Happy Valentine - Stamp Of the Month

Oh how I love the Stamp of the Month - Happy Valentine, the elegant roses & love themed phrases 
make it a perfect set - not just for Valentines day but for Weddings, Engagements and any project where you want to show your love for someone.
I used Ruby cardstock on this 5"x7" card - I scored the pieces at the top and bottom and then rubbed the ruby ink pad over them to accentuate the score marks.
The middle pieces were sanded using the coarse side of the sanding block
I stamped the image in Ruby ink and colored it using the ruby markers and olive markers.
I made swirls with the Black Sparkles and then added a scrap of Black tulle ribbon and 
small pieces of black gingham ribbon. Narrow strips of Black cardstock top and bottom to separate the areas and as a mat for the stamped image finishes it off.
 This gorgeous cream card is probably one of the easiest ever. A Colonial White cardstock base has a wide strip of Desert Sand cardstock and a piece of Black and White Striped ribbon wrapped around it.
A smaller piece of Colonial White cardstock is then stamped with 2 of the rose images in black ink 
& has Almond Glitz Gel Glue in the center of the flowers. 
The word Love comes from my favorite stamp set ever - Love Life - D1482. 
A knot of matching ribbon is glued to the front.
 Again Black cardstock is featured along with the Black & White striped Ribbon. 
This time I colored the images using the Sweet Leaf Markers and the Sorbet markers.
 This card was fun to do - I used the Casual Expression stamp set - D1525 and stamped it in Cotton Carndy ink - matted on matching cardstock and on Sweet leaf cardstock. 
The flowers were heat embossed using versamark ink and white embossing powder. I colored the embossed images using the cotton candy and Creme brulee and sweet leaf markers. 
Black sparkles added some 'bling'
 The last card featuring black hahaha - this time the large rose cluster stamp was embossed in Gold embossing powder and then the cardstock cut into 4 equal pieces and added to a white cardstock base. Again another very easy but very effective card.
 This card uses Chocolate cardstock which has been scored and rubbed over with the chocolate ink pad and then added a scrap of Avonlea paper and Smokey plum cardstock. the images were all stamped in smokey plum and then colored with sweet leaf and blush markers with a dot of honey ink in the center of the flowers. Then lots of Glitter tape for shine and glitter.
 The long card above uses Hollyhock and cocoa cardstock and matching inks. I stamped tone on tone with the small rose stamp on the flap and added the small strip of cocoa cardstock which I used the corner rounder with the guard removed to make the scalloped edge. Then pierced holes using the piercing tool kit.
The heart was stamped from the Love Life stamp set. Brown sparkles added shine.
 And this final card uses paper from Scholastic paper pack and the ribbon from the Pear and Partridge WOTG. I used silver embossing powder this time to give shimmer to the flower.
And this cute desk top calendar is the fun project we are making this month - the colors are Gypsy and Sweet Leaf. The calendars were bough online by a friend so I'm sorry I can't help you with the supplier :O(
We are using a mask to cover the center of the area and then removed when the stamping is finished so that you get a clear space - in the center of this is the sweet leaf cardstock mat.
The gypsy cardstock is tone-on-tone stamped with the same color ink - then I added the cricut cut image from Cricut Artiste and stamped 'Celebrate Today' from Casual Expression stamp set in Sweet Leaf ink. 
A little piece of the Black & White striped ribbon and a Bling gem finishes it off .
Well I hope I have given you lots of inspiration for using this gorgeous stamp set.
As with all of our limited edition Stamp of the months sets there are 2 ways of receiveing this set. 
You can pay the full price of $17.95 (+tax & S/S) or if you spend $50 on other items you will qualify 
to receive this set for just $5 (+tax & S/S)
Let me know if you would like this set 
Love Sara x