Wednesday, November 26, 2014

I'm Moving !!!!!

No don't freak !!!! - I'm not moving back to the UK :O)

I am leaving blogspot and moving to a Facebook account. Blogger has become so time consuming to try to edit and upload photos to that I have started a new Facebook account - more people seem to use that and it seems to be far more using friendly than this is. Maybe - just maybe I will be able to upload far more photos of artwork - far more quickly !!!

So here it is - my new Facebook account. 


So please, head on over to y new page and come and visit me there and like my page. 
I have no intention of deleting this page so the artwork will be here as long as Blogger allows this page to be open :O)

Thursday, August 14, 2014

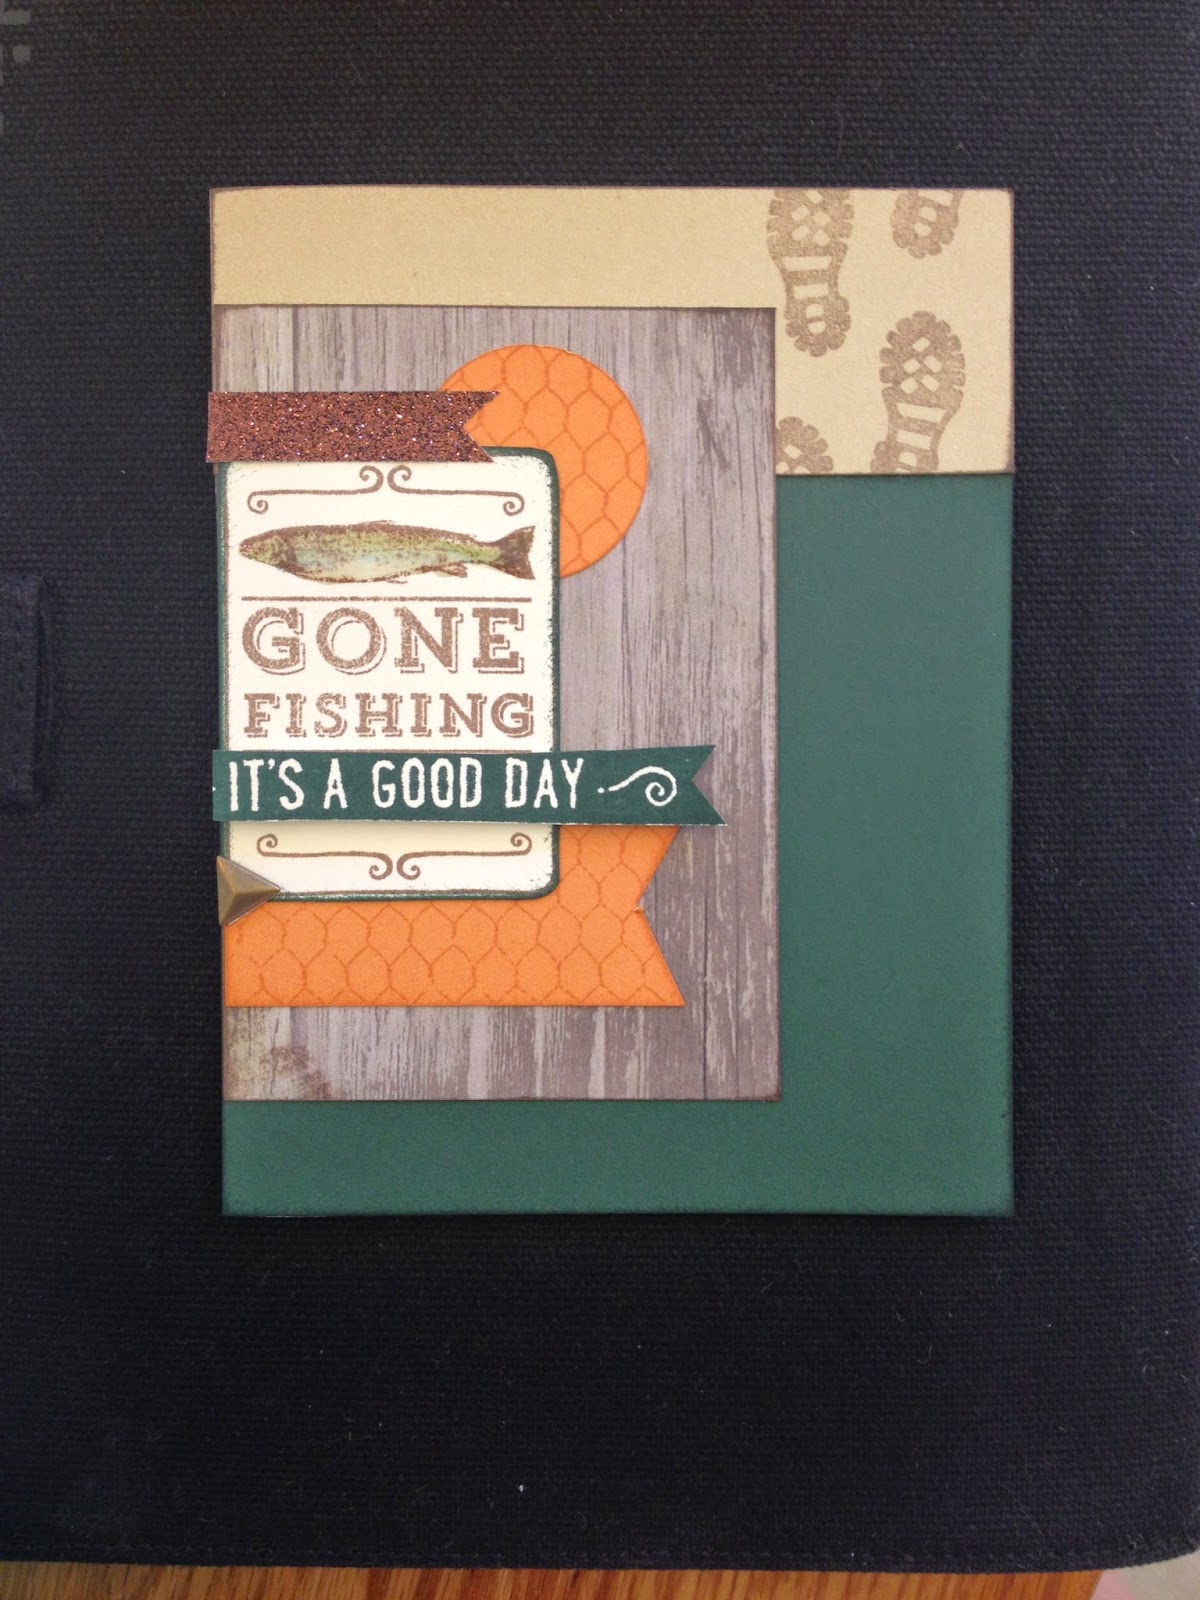
Gone Fishing Boys/Mans card

Oh I do like this card - it makes a change from always dong flowers and just because its for a boy or man doesn't mean its can't have lots of details :O)
I used Ponderosa Pine cardstock at the bottom and bamboo at the top - love those boot prints.
I used the Timberline paper but you could use any neutral paper pattern or even use the new Woodgrain Embossing folders we now have - they are awesome :O)
I stamped the chicken wire design from the Distressed Background stamp set in Goldrush ink on the Goldrush cardstock and stamped the Gone Fishing in chocolate ink. I colored the fish using the watercolor pencils - Dutch Blue and Olive.
The final touches were the sentiment stamped in Ponderosa Pine ink and popped up on 3D foam tape, the Triangle stud and a small piece of Bronze shimmer trim.
And last but not least when the card was complete - I added a layer of Liquid Glass to the fish to make it look wet and the help the colors of the pencils blend with the chocolate ink. It gave it a cool look.
Hope it inspires you to make one for the man in your life :O)
Love Sara xxx

Wednesday, August 13, 2014

Choker Style Necklace and Matching Bracelet - Extravaganza

 Here is another way to use the long necklaces. I tend to wear shorter necklaces so this was a great way of getting more of a chunkier look to offset the weight of the pendant pieces.  
The first Pendant piece with the Eiffel Tower has glitter cardstock inside the pendant.  I then added the Tower Charm and Liquid Glassed it to the rim of the Pendant. On the middle section I used the Cameo image from Storyteller Style Sheet. It is designed to fit the smaller Base and Bling pendant pieces so I added it to the larger oval pendant and then added some of the gold tone glitter paper to hide the gap. last Pendant again has the gold Glitter cardstock in the base with the crown charm liquid glassed directly to it. A sparkle decorates the top of the crown and more charms hand at various points around the pendants. I made the connection point in the front so that the extension chain acts as another charm effect.
I used the same techniques to create the matching bracelet but this time used the camera charm in the first section which I cut the hanging loop off and as a 'piece de resistance' added a tan sparkle to the center of the camera as a lens. As you can see I kept to the smaller circle shaped pendants for the bracelet so the Cameo design fitted beautifully.  Again I added more charms for more decoration.
Here you can see them as a matching set. I was really happy with the result :O)
Hope you like them too - Love Sara xxx

Tuesday, August 12, 2014

Family Love Pendant - Extravaganza

 Here is a fun way to wear our Base and Bling pendant pieces - especially if you don't care to wear a chain with your pendant. Here I threaded 2 square Base and Bling pendants onto the ribbon and tied them together with a simple knot. I placed them on top of each other like spoons.
I added a rose image from the Storyteller Style sheet and sealed it with a thick layer of Liquid Glass. While it was still wet I added the key charm and the heart charm. I added more liquid glass to both of these charms to add the Tan sparkle to the heart and the newGold Bling Gem to the top of the key. I added a small piece of ribbon to the top of the hanging loop for a little extra touch.
Then I made a small accordion style album to fit between the 2 pendants. I then used more of the word images from the same Storyteller style sheet to fit the sections. On the alternate sections I stamped a tiny heart in Hollyhock ink. I glued the bottom end into the bottom pendant and the top end to the back surface of the top pendant. I added a tiny piece of brown glitter paper to disguise the join where the paper attached to the top pendant.
Hope you like it as much as I do :O)    Love Sara xxx

Saturday, August 09, 2014

Leo's Graduation

 Yes here we all are, my babies and I - and my lovely husband  :O)
I know - you all usually see picture of Robyn and Leo and Elliott but yes - I DO have a husband :O)
So I managed to find someone to take a picture of all of us together - this doesn't happen very often as  it is usually me behind the camera taking the photos.
I can't believe Leo has graduated from Walled Lake Central - He seems so grown up.
And here is another one of my babies - this one makes my heart melt. I am so blessed to have them. It's funny because they are all so different in character and personality yet in some ways they are just the same. They are all fiercely loyal and will be the first in line to take care of the 'underdog' in a situation. They all have a great sense of humor and a so kind hearted. They are my life and I am so proud to be their  Little Mama xxx
Love Sara x

Friday, August 08, 2014

My Time To Shine Wall Hanging - Extravaganza

Ooooooh - I was so happy with the way this turned out :O) I had a bit of an accident with the Designed Decor Flip Stand Album and managed to break the hard acrylic stand which supports the album on a desk (don't ask - it was my own fault) and you know me - waste not want not - as my mama would have said. So I dispatched Richard to the garage with the instructions to remove the rest of the horizontal piece CAREFULLY without scratching the surface LOL. No pressure then haha :O)

Bless his heart - he managed to do it and sanded the edges smooth too.
I then unscrewed the 2 decorative screws and removed the 2 ring binder piece. I re attached the screws after I had inserted the cardstock background between the 2 layers of acrylic.

I used Outdoor Denim Pigment ink to color the Slate ribbon dark blue and when it was dry - threaded it through the holes and re-attached the screws.
I used one of the new Rectangular Pendants using 3D foam tape and used the words from the 'Journey Style Sheet'. More Ribbon threaded through the top of it allowed me to add a Star charm to it . I love the new Black Arrow Washi Tape which I layered over the Seaside Paper (think this has to be my new favorite paper).
A photo of my lovely boy before his Senior Homecoming party and a photo of the school logo and lots of the Brown/Tan Glitter paper finished it off nicely :O)
Hope you like it as much as I do - Love Sara xxx

Thursday, August 07, 2014

Antique Gold Circle Rose Pendant - Extravaganza

Here is a pendant where I altered the connection point of the chain by adding a jump ring from the charm. This way I was able to make this double loop of chain with the pendant hanging on the lower pice - I added a key, rhinestone and bow charms to disguise those jump rings and added the Rose image from the 'Storyteller Style Sheet' for a very Victorian feel to this. I used Liquid Glass to attach the glass cover to the pendant.
Hope you like it - Love Sara xxx

Wednesday, August 06, 2014

A close up of yesterdays pendant :O)

Yes - I have had a couple of emails from ladies asking "Please - do you have another photo of the very burry necklace from yesterday??"  Well yes I do - this shows the stitching in far more detail so I hope this helps. Make sure you adhere the 2 pieces of cardstock/paper together really well before you start piercing and then stitching it together.
Love Sara xxx

Tuesday, August 05, 2014

Base & Bling Pendant #1 - Extravaganza

Finally - I have caught up with my life a little and I am able to start posting some of the photos of my Extravagana artwork - and I have to apologize for the slightly blurry image. Good Grief !! Im a scrapbooker for goodness sake - I should be able to take a photo.!!!  
I have no excuses I was tired and thats all :O)

Anyway this pendant is made with 2 of the cardstock pieces from the new
'In The Pink" My Crush assortment.
I glued the 2 pieces together and then took single strand from the Neutral Bakers Twine and using the Stitch Guide to make the holes, 'cross stitched' the 2 pieces together along the join.
I attached it to the pendant base with Liquid Glass and then added a very thick layer of Liquid Glass to seal it. While it was still wet I balanced the tiny heart charm in the corner with a Bitty Sparkle to disguise the hanging loop.
When it was completely dry (3 days) I added the arrow to the back of the pendant.
I moved the connection pint of the chain to give this more of a 'lariat style' to this necklace and added another arrow and rhinestone above the pendant.
Hope you can forgive me the blurriness and hope you like it :O)
Love Sara xxx

Monday, August 04, 2014

Oh My Goodness !!!

If you have visited this blog in the last hour you would think that the whole site has been turned upside down.
For some reason Blogger changed my template - so I have spent the last hour trying to get everything back where it was. Still have no idea how to center the title LOL.
SO don't panic if it all changes yet again - I will keep fiddling with it until I am happy with the final result :O)
So I will keep this short and carry on playing !

Wednesday, July 16, 2014

Retiring items and While supplies last ...............

Yes it is that time of year again - retiring some of the fabulosity in the current Idea Books to make way for even more fabulosity to be announced in the new Annual Inspiration Book from CTMH.

SOOO what is retiring Sara??  I hear you say
well click on this blue link below 
and it will take you to the page to show you what is leaving forever.
You can order it directly from this link or you can email me with your list of Must Have items :O)

And while you are in the mood for a bargain - click on this blue link below
and it will take you to the list of While Supplies Last Items - which are exactly what they say they are - when these goodies are all sold - there will be no way to get your sticky little paws on them !!

So don't delay :O)
Love Sara xxx

Tuesday, July 15, 2014

Timberline Workshop on the go Scrapbook layout - 2 versions :O)

Hello Peeps :O)  did you miss me LOL :O)

 I will try to bombard this blog with some posts and get you back in the loop - its just crazy here - No different from any other time I hear you say haha :O)

SO here is my layout created with the Timberline WOTG - now - to this first version I added Bronze Shimmer trim and the matching Stickease - and its adorable :O)
And this is what I planned on teaching BUT - the Stickease are sold out :O(
So I have had to redesign it by removing all of the Stickease elements and replacing them with stamped or cricut cut items. I have to say that I am pretty happy with the result :O)
I cut the trees using the CTMH Cricut Artbooking Cartridge and tried to keep the layout pretty much the same.  Hope you like it :O)

Remember that Timberline and all of the other papers in this current Idea Book will retire at the end of July so if you need any of them - the time to order is NOW. 
Don't delay - they are selling out fast :O(
Visit my website at   sarabatkin.myctmh.com to place your order xxx

Love Sara xxx

Sunday, July 06, 2014

I'm back :O)

Hello everyone :O)

Yes I am back from California where I spent a week in the sunshine at the annual CTMH convention.

As much as I love the artwork and the unveiling of new products - I think that I love seeing the friends I have made from around the country even more xx

A terrible sinus infection and double ear infection has wiped me out - followed by intense back pain this morning so I am lying here flat on my back with the computer propped up on pillows while I attempt to type one-handedly.

My life is never boring !!!!

The artwork I created for Extravaganza will start to post August 1st when the new idea book is released so you will have to be patient just a little while longer :O)

hope everyone had a wonderful July 4th celebration.

Much love, Sara xxx

Monday, June 09, 2014

Leo's 18th Birthday Card


Leo loved his birthday card - I can't believe my baby is 18 already!!! You blink and miss it.
Here I raided my stash of metal accents and large grey sparkles from the Halloween assortment.
Lots of Birlap ribbon and paper from the Frosted paper pack added pattern to the Desert Sand Base.
I dry embossed the Outdoor Denim cardstock accent peice.
I used the Cork numbers for more texture and the Colonial White color ready seam binding ribbon.
I was really happy with it - Hope you like it too 

Sunday, June 08, 2014

Its that time of year again !!!

I KNOW - I was doing so well with months and months of posts regularly from Mondays through to Fridays - and now for the last 2 weeks - NOTHING!!!

You all know why ............!     I am creating for Convention , trying to teach both jobs, dealing with a graduating high school senior - which equals working 7 days a week - so my poor little blog gets forgotten.

So with all of that in mind - please hang on - don't give up on me - and I will try to post artwork when I can between now and the end of the month when I head for California to teach at the Close To My Heart Convention xxxxx
Love Sara xxxx

Tuesday, June 03, 2014

Kaboom - Stamp of the month card

I want to have a party and make these fun invites.
I used the Chevron Embossing Folder to make the background and then rubbed the Pacifica ink pad over the op which really highlights the pattern.
I wrapped Backers twin around the side of the card and made the fun ticket by stamping the image 3 times and then cutting different parts from each image and paper piecing them together.
I used the 1 1/4" circle punch to cut the 2 circles for the "fun" image and stamped them in
 Honey and Cranberry inks.
I will make sure to send you and invite when I set the date :O)
Love Sara xxx

Thursday, May 22, 2014

Doodle Signs Cards

Here is a cute card for a friend - I used the Hostess Reward set from page 7 
of the Spring/Summer 2014 Idea Book.
I used the gorgeous Laughing Lola Paper and Black and Gypsy inks.
I added the White Enamel shapes over the stamped triangle images
and then lots of Purple Glitter Gems to make it sparkle.
I used the Scallop Border Punch and piercing tool on the black cardstock.
Hope you like it - Love Sara xxx


Wednesday, May 21, 2014

She Believed She Could .....


I earned this little stamp set at a recent CTMH event here just outside of Detroit.
Close To My Heart held a fun evening of creating and during the business session I won this cute mini stamp. 
It really does sum up my business and work ethic - especially when it comes to earning the 
CTMH Cruises and Land Tours.
I used the beautiful Skylark paper pack and added Teal Shimmer Trim and Aqua Dots.
Hope you like it :O)  Love Sara xxxx

Tuesday, May 20, 2014

Belated Birthday Card.

Here is a fun and very easy card featuring the Embedded Embossing technique.
I used White Daisy cardstock and added circles cut in Lagoon, Pear, Cotton Candy and Whisper cardstock.
Then I ran it through the embossing machine using the Dot background.
I used the Belated Birthday stamp set and stamped the cake in Lagoon Ink and the words in Slate and Black.
Flamingo Dots made perfect 'frosting' on the cake :O)
Hope you like it - Love Sara xxx

Friday, May 16, 2014

Cricut Artbooking Baby Boy card

Here is the last of the 4 cards designed by Dawn Montagano - and this one is pretty much how she designed it.
It features imagages from pages 84/85 from the CTMH Artbooking Cartridge.
It is so cute :O)
We used Bakers Twine on the title piece and the end of the branch.
I added the dark grey Epoxy Bubbles to the owls eyes.
Hope you like it too.
Love Sara xxx

Thursday, May 15, 2014

'Hooray' - Timberline Owl card

Dawn Montagano again was the designer of this card which I altered a little to suit my style.
I added 3 rows of Chocolate Woodgrain Washi Tape over the Chevron Embossed background and the gorgeous Woodgrain paper from the Timberline paper.
The scolloped circle is from the CTMH Cricut Art Philosophy cartridge - I then pieced tiny holes around the edge.
Here we just used the word Hooray - on a thin piece of cardstock.
Honey Triangle Washi Tape and Silver Metallic Washi tape add a fun accent to the 
bottom right hand side of the card - along with a flower image embellishment from the Lollydoodle Assortment.
Hope you like it - Love Sara xxx

Wednesday, May 14, 2014

Hoot Hoot Hooray Card - Cricut Artiste

Here is another fun card designed by Dawn Montagano which again - I put my spin on :O)
I added the fun Chocolate Woodgrain Washi Tape to the Skylark Paper pack .
Aqua Dots are used to accent the present image and the owl's eye. Again B1450 Owls was used for the stamped images.
The CTMH Cricut Artiste cartridge was used for the cut images.
Love Sara

Tuesday, May 13, 2014

Owl Miss You - Card

This is a cute tri-fold card designed by Dawn Montagano - she put the card design together and I altered it a little.
The stamp set is B1450 - Owls and is super cute. The owls would be adorable on a baby page.
The feathers are from the CTMH Cricut Artiste Cartridge.
I added the Flamingo Dots for a fun accent.
Love Sara xxx

Monday, May 12, 2014

Lollydoodle Scrapbook WOTG Layout - Cricut Artiste

This is such a popular paper pack - I have so many customers who are so in love with this :O)
I added the Pink Glitter cardstock to the layout and cut the image for the sentiment using the CTMH Cricut Artiste cartridge.
I added the cute adhesive backed gems and Flamingo dots for more embellishment.
(love that these WOTG kits come with all of the fun accessories)
Hope you like it too - Love Sara xxx

Friday, May 09, 2014

Balloon Ride WOTG Card - class project - Cricut Art Philosophy.

I do like to make cards which have a different opening method.
This one opens like a matchbook.
I used the stamp set from the Balloon Ride WOTG and stamped the large image in Sorbet ink.
I stamped the 'Stamps' in Cashmere and Crystal Blue inks and the scroll image on the Saddle cardstock in Saddle Ink.
Bronze shimmer trim adds sparkle to the bottom of the card and then I have used some retired
Chocolate flower buttons with s Brow Sparkle in the center to add a little more accent to it.
Hope you like it - Love Sara xxx

Thursday, May 08, 2014

You've Got A Friend card - class project

I really like the color combination on this card - Smoothie and Sweet Leaf give it a fun Spring feel.
This would be perfect for a congratulations card for exams or end of school year or as a thank you for a teacher :O)
I also added the small star from my favorite ever stamp set - Love Life and the dark smoothie and Whisper images are actually from the Charming Chevron set.
Smoothie Stripe Washi Tape over white cardstock (which really makes the color pop) and a piece of silver shimmer trim completes the right hand side of the card.
I stamped the image twine and popped up the center of the image on 3D foam tape.
2 clear sparkles finish it off.
Hope you like it :O)
Love Sara xxx 

Wednesday, May 07, 2014

You've Got A Friend In Me - Washi Tape Card

Here is a quick and easy card :O)
I used the Smoothie Washi Tape and Silver Metallic Washi Tape along with 
Silver shimmer trim to decorate the background of the card.
I used both Whisper and Slate Cardstock squares behind the saying which I stamped in Smoothie Ink.
I LOVE the fact that our embellishments (Washi Tape, embellishments etc - match our inks and papers - it makes for a much more professional finished project )
I added a tiny white ribbon bow from the Laughing Lola embellishments and clear sparkles and a couple of tiny scraps of Shimmer Trim behind the bow.
Super easy, Super quick and Super Cute :O)
Love Sara xxx

Tuesday, May 06, 2014

You've Got A Friend - Timberline Card - Cricut Artiste

Oh I just love this card - how much fun is this for a little boy's birthday.
I cut the Rocket Ship using the CTMH Cricut Artist cartridge and then covered it with the Metallic Washi Tape.
I used the new Timberline Paper pack and chose the star gazing paper - just perfect with these words.
Silver Shimmer Trim added sparkle to the top.
I can't tell you how much I love this one - hope you do too :O)
Love Sara xxx

Monday, May 05, 2014

Give a Lift Card

I saw a card which had been made by the uber talented Liza Stenz where she had
layered the pieces of this beautiful balloon - so I totally stole her idea :O)
I used the Balloon Ride paper which I adore.
I stamped the Hot Air Ballon image 4 times - twice on the blue patterned paper,
once on the cream patterned paper and once on Saddle cardstock.
I cut the the entire balloon image out of the 2 blue bases, and just the center band out of the
cream patterned paper and just the center piece from the Saddle cardstock.
I stamped the entire image onto the Colonial White cardstock center piece and then 
the first blue base was attached directly to it  and the other 3 pieces were attached with 
3D foam tape between them.
I stamped the basket and the flowers on a second piece of colonial white cardstock and carefully
cut out the image - I cut away some of the thinner flower stems just leaving the larger ones
to make it easier.
Then I colored the base image and the overlay with the Watercolor Pencils.
Again 3D foam tape popped it up for dimension.
I added a sparkle accent from the Rosewood Mini Medley and then either side of the Hot Air Balloon 
I added pieces of the Zipstrip. Bronze Shimmer Trim and lastly Balloon Ride B&T finished 
the center section.
I stamped the word Welcome in Cocoa ink and added a 2nd sparkle accent from the 
Rosewood Mini Medley.
I was thrilled with the finished result and hope you like it too xxx
Love Sara xxx

Friday, May 02, 2014

You've Got A Friend Stamp of the Month Card

Here is a fun 'End of School' card for a teacher or favorite student
I used the paper from the Jubilee Level 2 paper pack and added the Distressed Backgrounds
stamp set - using the chicken wire image (Love this image)
The paper and stamped images also give it a fun 'Summer Fair' feel.
I stamped the apple image in Ruby ink and then cut out a 'mask' and covered the word and then
sponged more Ruby ink over the image - this way it really draws your eye to the word which
is still un-inked.
Bronze shimmer trim and Durable round studs finish it off :O)
Hope you like it
Love Sara xxx

Thursday, May 01, 2014

Balloon Ride WOTG Scrapbook Layout

Oh how I love this paper - it is so, so pretty when you see it in person
It is so difficult to see all of the pretty details on a 2" square in the Idea Book so I can't wait to share this with my Lovely Ladies this month.
I added Tan Glitter paper and stamped the triangular image in Juniper Ink on the Juniper cardstock.
I used Sorbet Ink on the saying and then added the Sparkle flourishes and Balloon Ride Assortment resin flowers along with the Matching Dimensional Elements to embellish the page.
I was thrilled with the results - hope you like it too :O)
Love Sara xxx

Wednesday, April 30, 2014

Today is the last day !!!!

Don't miss out on getting $400 of scrapbooking product which 
includes a Cricut cartridge collection of YOUR CHOICE for just $99.
Today is the last day for you to join a fun group of ladies who love messing around with paper and ink for such a low price for such a huge amount of product.
There is no pressure to be part of my team - if you want to take the kit and run - thats fine - you are able to do that.
If you want to be a hobbyist and get your own scrapbooking products at a discount - thats fine - you are able to do that
If you want to be a business builder and earn money for whatever you like plus get your own products at a discount - thats fine - you are able to do that.

The beauty of Close To My Heart is that every way is the right way :O)

Make sure you click on the link or contact me before midnight if you want to take advantage of this - you don't want to miss out. xxx
JOIN CTMH TODAY :O)

Tuesday, April 29, 2014

State Discovery Game

I absolutely love this fun 'State' game designed and made by my friend Mihoko Yoshihara.
She stamped a 'trail' of circles with images and fun words and then added larger pieces detailing  fun places visited in Florida.
She is so very creative - from the game pieces to the flowers and the Cricut cut shapes - all of the details about the different towns - I absolutely love everything about this game.
I hope you like it as much as I do and a big "Thanks" to Mihoko for sharing it.
Love Sara xxx

Monday, April 28, 2014

My Creations 6x6 Memory Showcase Album

Here is another piece of artwork by the talented Kiyo Kuroyanagi - an adorable 6x6 My Creations Memory Showcase album.
Kiyo has used lots of tags to add extra photo space and tucked them into the pocket on the 3rd section.
Overlapping the photos was another way to add photos and give it a fun look.
I love the combination of stamps that she used.
Hope you like it too and thanks to Kiyo for sharing  :O)  
Love Sara xxx

Friday, April 25, 2014

My Creations Bracket Frame

I am very excited that over the next few days I am going to share some Guest Artist artwork 
made by my friends and customers.
I love teaching my card and scrapbook classes and often people will show me what they have 
made with the products they have bought.
This amazing CTMH My Creations Bracket frame was made by the very talented Kiyo Kuroyanagi - and I asked her permission to share it with you all.
I love the combination of the Typeset paper with the fun tags spelling the School Name and the way she has threaded them on the Bakers Twine.
I also love the combination of photos as this frame is big enough for either one or more photos.
Thanks to Kiyo for sharing with us and if you have artwork you would like me to feature - let me know :O)
Love Sara xxx

Thursday, April 24, 2014

A Mother's Love Card

This is such a pretty card - just perfect for Mother's Day next month.
I used Gypsy cardstock for the base and added a 3x4 piece of SweetLeaf cardstock.
I cut a piece of white cardstock at 2.75 x 3.75" and random stamped the overlay Hydrangea
image in 2nd generation Gypsy ink to give it a patterned background.
I added 3 pieces of Purple Shimmer Trim and then added 3 small flower images to cover the ends.
I stamped the leaves in Sweetleaf ink and the flowers in 1st & 2nd generation Gypsy ink and the last flower in 2nd Generation Cotton Candy ink and overlaid it with a 2nd generation image in Gypsy ink.
Pink Glitter Gems finish it off.
Hope you like it :O)   Love Sara xxx

Wednesday, April 23, 2014

Costa Rica Travel Mugs

These decorated travel mugs from Starbucks turned out so well. They are so stinking cute :O)
I love the fact that you can decorate them anyway you want to - the only word of warning - don't make the inserts too think of they won't fit in between the 2 layers of plastic - so - no brads or sparkles so I go way overboard with the Prisma Glitter instead :O)
 I made one for me and one for Victoria and we discovered that a bottle of Champagne 
(or wine) will fit perfectly in the 2 travel mugs :O)
 I used the C1575 True To Life stamp set along with the Costa Rica trip set.
I still have the Bingo Alphabet - one of my favorites - so I used it to personalize mine.
 I used Crystal Blue and Pacifica inks for the butterflies and Pear, Juniper and Sorbet for the 
cutest frog on the planet :O)
The lizard was stamped in Chocolate ink and I used Desert Sand for the 'Beach" stamp which I colored using the Watercolor Pencils.
Hope this inspires you to create one of your own - Love Sara xxx

Tuesday, April 22, 2014

Basics Paper Fundamentals Card.

I was so geeked when this card turn out the way that I had imagined
 (it doesn't alway work out like that you know !!)
I was inspired by the layout on page of the Spring/Summer Idea book.
I loved the way that the colors really popped against the embossed black cardstock.

I added lots of sparkle with the Purple Shimmer Trim, Pink Glitter Paper, Green Glitter Paper and Teal Shimmer Trim.
More shine and sparkle with Purple glitter Gems, Flamingo Dots, Ivy Lane Compliments resin Flower, Green Epoxy Bubbles, and Aqua Dots and Durable Triangle Studs in Gold.
Then even more embellishment with the Gold Dot Washi Tape and Lagoon Washi Tape.

The images are from the Ivy Lane Scrapbooking Workshop on the Go Kit.
I absolutely love the finished result and hope you do too - Love Sara xxx

Monday, April 21, 2014

Ariana Love card - Balloon Talk

I am having so much fun with this Stamp of the Month set - Balloon Talk.
It is so versatile - I have used it with so many different papers and it works with all.
Here I used the Ariana Workshop on the Go - the base is the Hollyhock cardstock
and I stamped in Hollyhock ink to give a Tone on Tone effect.
I used the same stamp ( from the Workshop on the Go) in Buttercup ink on the
squares so that they didn't look so plain.
I stamped the same image on the white Cricut heart shape.
I added Desert Sand cardstock which I scallop punched and then added holes made with
the piercing tool.
I then added a small strip of the Zipstrip along it.
I attached Bronze Shimmer trim either side of the patterned paper and 
3 Brown sparkles finished it off
Hope you like it - Love Sara xxx

Friday, April 18, 2014

Jubilee Thank You Card - Balloon Talk

This card uses my favorite set EVER - as you know - D1482 Live Life Love - I think
that everyone on this planet needs this set - I love the swirls :O)
I used the Kraft cardstock in the Workshop on the Go and stamped the sentiments
and the swirls in Cocoa.
I used the Topiary cardstock and the Bandana printed paper. It has some Indian Corn Blue
ink colors in it so I used that color cardstock behind the sentiment.
I added a thin strip of burlap ribbon and then made a fake bow with more Burlap.
I tucked Silver Shimmer Trim behind the burlap and some silver sparkles and
there you go :O)  Love it!
Hope you love it too - Love Sara xxx

Thursday, April 17, 2014

Birthday Card - Scholastic paper pack

A 17th Birthday card for my boy xxx 
It is only a year late in posting - but what the heck - it has taken me this long to find the photo of it LOL :O)
I used one of the 3 1/2 x 8 inch cards from CTMH as the base. 
Originally it had a  flap to it and it was too 'girly' for this card so I trimmed it down so that 
it had a nice straight edge.
I used some of the now retired Scholastic paper and added Outdoor Denim cardstock to the flap.
A smaller piece of paper was tucked under the cocoa ribbon and I took 3 Dinemsional Element Stars and inked them in Olive ink - then added a thin layer of pearl paint to the 2 smaller stars and added
Prisma Glitter to the large star.
I did the same with the Dimensional Element numbers.
I stamped the swirls in Cocoal and the sentiment in 2nd Generation Cocoa ink.
He loved his card - hope you do too :O)
Love Sara xxx 

Wednesday, April 16, 2014

Nautical wall hanging

Here is a wall hanging which I made back in the summer using the Tommy paper pack which I really like. The Base is cut from Chipboard which made it really sturdy and we used the 
CTMH frame as a pattern as is has such a nice shape.
The Burlap Ribbon ribbon goes really well with this paper pack and I used 
Desert Sand Ink to distress everything.
I also added the now retired Milepost Shapes which I inked with Outdoor Denim ink and 
Cranberry inks which are 2 of the colors in this paper pack.
Durable Studs squares were a perfect way to add decoration without it losing the Nautical feel
and the sentiments were from the Zip Strip.
Finally a cute picture of my beautiful baby girl and her friends from their 
cruise vacation in the Caribbean :O)

Tuesday, April 15, 2014

Laughing Lola Love Wall Hanging - Extravaganza 2013

I seriously love this piece of artwork which I made for Extravaganza last year. 
The photos were taken by the seriously talented Jennifer Cashin from JLCashin Photography 
I think this is the last piece that I haven't shown you and I apologize it if is somewhere else on here.

I used the Dimensional Element Mini Album pages which are Cricut Artise Cartridge compatible.
Here I added photos directly to 3 pieces using Liquid Glass then carefully cut around them and sanded the edges till they were smooth again.
I decorated the top and bottom pieces with the Laughing Lola Paper and matching 
Dinemsional Elements.
I made flowers using the Cricut Art Philosophy cartridge and added sparkles to the centers of them.
I colored our Color Ready ribbon with Gypsy ink to get a soft Lavender color and added the 
wooden swirls from the Mini Medley collection.
The words were stamped using the new E1027 Framework Alphabet and then cut out - yes it took a little time but so worth it.
These I layered on Black Glitter Cardstock which was in turn layered onto another larger Dimensional Element.
Lots of Prisma Glitter finished it off and I LOVE IT :O)
Hope you love it too - Love Sara xxx

Monday, April 14, 2014

Pillow Box chocolate Gift box

I know this is a little difficult to see but this is the best I can do - it doesn't matter what the background it - the box is clear and hard to photograph :O)
I used the Frosted Paper pack and the Stamp of the month from December - Special Care.
I covered most of the stamped image just leaving "Hugs and Kisses required" and then filled the clear CTMH Pillow Box with Herseys Kisses.
The red and silver wrappers for the chocolates were perfect with the Silver Shimmer Trim and the 
Ruby Mini Medley Flower.
A cute Stocking Stuffer for Christmas :O)
Hope you like it - Love Sara xxx

Friday, April 11, 2014

Ballon Talk Stamp of the month Explosion Card

I have made lots of these explosion cards over the years so I will just show you the cover of this one.
I used the outline of the speech bubbles in Outdoor Denim and Sorbet inks to create a random geometric pattern - I know - WWWAAAYYYY out of my comfort zone hahaha. 
Not a swirl in sight !!!
I attached it to a slightly larger square of Sorbet cardstock.
A 1" piece of Outdoor Denim cardstock and a narrow piece of the Ariana paper and a scrap of the Ariana Green cardstock added more ribbon shapes and a piece of Bronze Shimmer Trim added sparkle and shine to it.
The sentiment was stamped in Outdoor Denim ink and popped up on 3D foam tape.
It didn't take me long to make this. 
the hardest thing for me was the geometric bit :O)
Hope you like it - Love Sara xxx


Thursday, April 10, 2014

Embossed Skylark inspirational card

Oh how I love this card.
I know it looks involved but it took me less than 10 minutes to complete.!!
It featured embedded embossing which is a technique where you attach layers of paper or cardstock
together and then run them through an embossing machine.
I used the new CTMH Damask Embossing Folder which I absolutely love - very much my style
as you know :O)
Here is a tip - if you are going to distress the edges of your cardstock then do it before
you emboss it. If you have a very complicated design like the one above it puts quite
a lot of tension on the edges of the cardstock and it can rip along the pattern if you try to 
distress after it has been embossed.
So I attached a piece of Whisper cardstock to the Juniper piece and embossed them and then
added a small piece of the Skylark Zipstrip.
The bird and words and white daisy are all Skylark Dimension Elements and the
Green resin flower is from the Skylark assortment.
I used the small heart image from the WOTG stamp set and used Desert Sand ink (I also distressed all of the pieces in Desert Sand ink too)
I added liquid glass to the heart for some shine.
The sentiment and the heart are both popped up using 3D foam tape.
Hope you like it as much as I do - Love Sara xxx

Wednesday, April 09, 2014

Sarita Scrapbook Layout

Its is nice to have a layout with lots of embellishments and decoration - but they do take a little longer to make and sometimes you just need a quick and easy layout to get photos on.
I really do like this layout design - it is from the Make It From Your Heart Volume 2 - Design 14.
I added Blush and lagoon cardstock to the decorative paper and used the Outdoor Denim design for the longer ribbon shaped pieces.
I added a piece of the Goldrush colored Zipstrip to the title piece and raided my stash of large paper flowers (unfortunately now discontinued) and stamped them in Blush ink.
I added a 1 1/4" circle of Outdoor Denim cardstock under the ribbon and I added a small piece of the Colonial White colored ready ribbon to the center of the button.
I think its cute - plus it was quick and easy :O)
Hope you like it too - Love Sara xxx