Wednesday, January 29, 2014

For Always My Creations Star

This pretty decorative Star was made in the Spring and I don't think I posted a picture of it so I apologize if I did
I started with the My Creations Star and then added the For Always fabric. I just used Tombow Mono Adhesive on the front of the start to hold the fabric in place and then glued the cut edges on the back of the star with liquid glass.
The fabric flowers were made from the For Always fabric - the pink one I used the pigment ink to color the white and black fabric.
The Green flower is made using the Chantilly Fabric with a layer of the Black Tulle Ribbon.
I inked the Color ready Seam Binding ribbon with the Pear marker and then used Liquid Glass to attach Filigree Charms to the centers of the flowers and to attach the flowers to the star.
It was a really quick project - only just over an hour :O)
Hope you like it - Love Sara xxx

Tuesday, January 28, 2014

Embellished Burlap Bags

Hope you enjoy the Video from the Close To My Heart Creative Studio with a fun was to dress up our adorable Burlap Bags :O)

Monday, January 27, 2014

Babycakes Scrapbook Layout

 This layout is worth getting pregnant for - if only to be able to put baby photos on it.
I mean - come on - its adorable :O)
Its the cute giraffe again - this time on the adhesive canvas shapes. I used the soon to be retiring Paradise paper flowers and the matching Babycakes assortment buttons in the centers of them
The Bronze Shimmer trim co-ordinates perfectly with this paper and adds some sparkle. 
Hope you think its adorable too :O)
Love Sara xxx

Friday, January 24, 2014

'Dream Big' Babycakes Workshop On the Go Scrapbook Kit

 Okay - I wanted to show how this kit didn't have to be about babies.
I used the spray pen with Sunset reinker to add texture and color to the background cardstock.
I used the paper with the alphabet on it so that this layout could be used for school or children of any age - not just babies. I added the bronze Shimmer Trim over the words 'little one' on the Dream Big stamp - that way this can be used for any occasion - it could be a piano exam page or a Spelling Bee.
I love the co-ordinating adhesive buttons that comes with this Workshop on the go.
Don't forget January is the last month it is available so don't miss out :O)
Love Sara xxx

Thursday, January 23, 2014

May your days be merry and bright :O)

A quick post of a Winter/Xmas themed layout which I taught last month using the super popular limited edition Sparkle and Shine Paper pack.
I love the trend of cutting the V shape into the end of a scrap of paper or cardstock to give it a 'banner' or 'ribbon' feel and the stripey paper is perfect for cold days with its candy Cane appearance.
Its difficult to see but it does have Glitz Gel Glue in the center of the snowflakes which I stamped using Ruby ink on the Ruby cardstock bases and in Whisper ink on the Whisper cardstock pieces.
Hope you like it :O)
Love Sara xxx

Wednesday, January 22, 2014

'Piece of Cake' Birthday Cards

Okay I fess up - this is a retired stamp set and its retired paper - 
but I had so much fun making these over the weekend - I know so many of you bought the Claire paper pack when it was available and the Piece of Cake stamp set was one of the most popular birthday sets so off I went and spent an hour happily creating Birthday cards :O)
 Silver Shimmer Trim added some sparkle and the Hearts were a fun touch.
Hope you like them :O)
Love Sara xxx

Tuesday, January 21, 2014

'Fabulous' Wall Hanging

This is made from the upside down base of the My Creations Collage Cube Tray.
It was a perfect size to make a little wall hanging.
 I have to say that I do love this Laughing Lola paper - the black and gold and pink can make it look really 'girlie' or you can choose the blue and gold and black patterns for a more family/masculine look,
you can see I went for the girlie look here hahaha :O)
More flowers, glitter, glitter paper and sparkles and more of the Base and Bling Purple Jewels withe the flowers and the larger pink sparkles. - whats not to like??
I do like using the black and white photos with this paper pack - that way the colors in the photos don't compete with the paper patterns.
Hope you like it :O)
Love Sara xxx

Monday, January 20, 2014

Laughing Lola Gift My Creations Craft Container

Oh does it get any better than this??? 
Sparkles and glitter and flowers and sequins and Liquid Glass and Glitter Paper, Create-a-Shade Pearl Paint - HEAVEN :O)
Thrilled with the success of the previous Mr Creations Craft Container I decided to recreate it again - 
I'm telling you I could make dozens of these and not get bored of them 
 I cute the flourish out of Black cardstock using the CTMH Artbooking Cricut Cartridge (page 78 - Friendship Layout) and then added a layer of Liquid Glass to give it some stability.
 The Dimensional Element gave me a perfect base to attach more flowers and more Dimensional elements and resin flowers from the Base & Bling Purple Jewels Collection 
Love Love Love Love Love the finished project and hope you do too :O)
Love Sara xxx

Saturday, January 18, 2014

Too cute !! Baby card

Is this the cutest giraffe EVER !!!
I love this card - that's all..
No seriously I do - I used the vine border to create a tree in the top corner after I had used the spray pen to give a hint of color to the background.
I stamped the Giraffe in Chocolate ink - colored in his spots with the honey watercolor pencil and the liquid glassed him all over :O)
Burlap ribbon, neutral bakers twine and a selection of  stamps from the Washi Wonder set (this is another must have set) along with a scrap of paper from the Babycakes paper pack and this card was good to go.
Hope you like it too :O)
Love Sara :O)

Friday, January 17, 2014

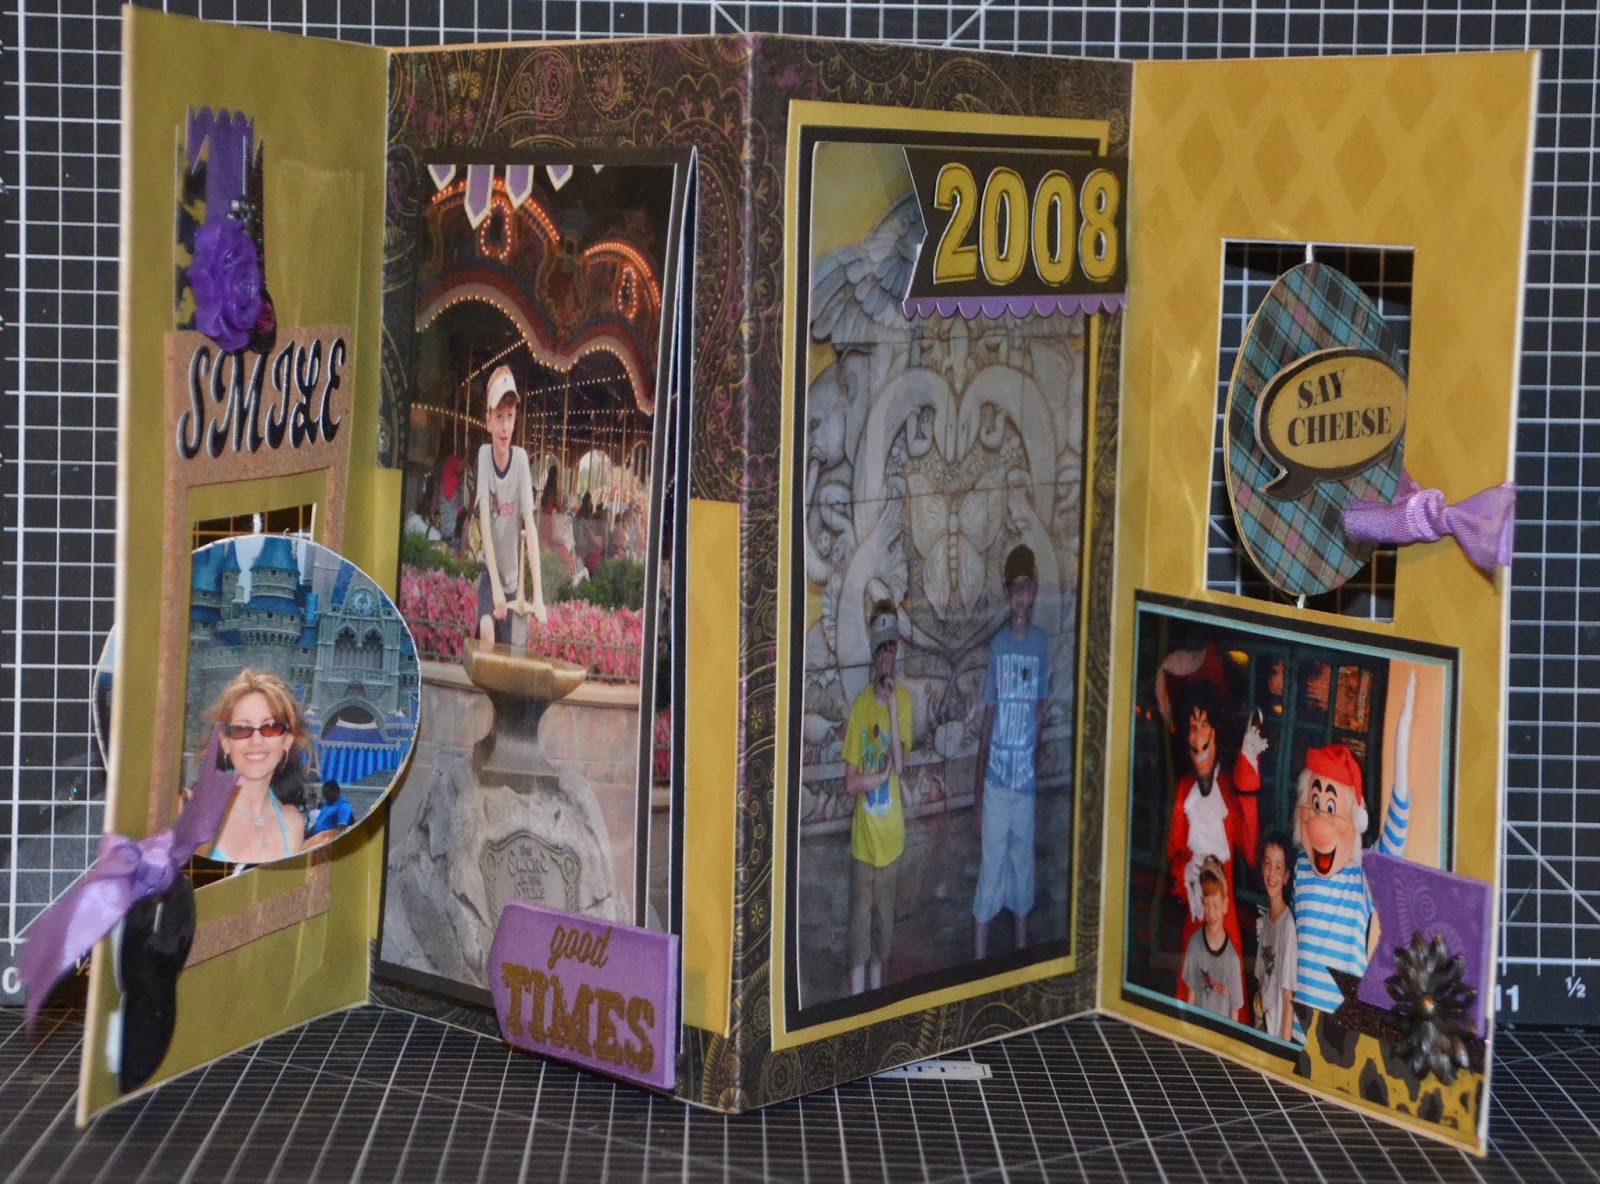
Disney Circle & Spin card Mini Album

Oh this one was fun to make :O)
I took 2 CTMH Circle & Spin cards and then took a 7"x2" piece of cardstock scored vertically and attached to the back of the cards so that they became one item.
I used the same technique with the stencil created with the CTMH Artbooking Cricut cartridge which I talked about yesterday to decorate the Laughing Lola Gold cardstock. I attached photos to the spinning section of the card and added a lift up section so that I would be able to add more photos.
 I used the Z1811scallop boarder punch on the Gypsy cardstock under the '2008'. This was stamped using the new E1027 Framework Alphabet.
The Mickey Mouse image on the spinning section was created with 3 circles which I overlapped and then covered with Liquid Glass to make Mickey look shiny.
 On the other side of the spinning section I added the dimensional element from Laughing Lola 
"Say Cheese" seemed so appropriate :O)
Hope you like it - Love Sara xxx

Thursday, January 16, 2014

Good Times

I taught this fun card both at Convention 2013 and at our local unit meeting for 70 ladies :O)
I started with the CTMH Circle and Spin cards and the Laughing Lola paper pack and added Gypsy cardstock which I had decorated using Bamboo ink and one of the new CTMH Artbooking Cricut page pieces. I used it as a stencil.
The butterfly is from B1432 Love This - which is features with the new My Crush Bluebird Mini Scrapbook.
I stamped the image in Black Stazon ink - sponged Crystal Blue and Gypsy ink onto it then covered it with a thin layer of Create a Shade Pearl Paint. Black Sequin Ribbon made the body of the butterfly.
Hope you like it - Love Sara xxx

Wednesday, January 15, 2014

For Always Birthday cards

More fun with the For Always Paper Pack :O)
This has to be one of my favorite paper packs as it is so versatile.
On these 2 cards I blended colors together to make a shaded background on the white and black paper.
I used the Texture Tools - the sponge tool - and three colors of ink.
I started in the top right hand corner with Blush ink then blended a band of Cotton Candy ink across the middle of the card and finished with Hollyhock ink in the bottom left hand corer
 This card started with Cream Brulee ink in the top right hand corner - Honey ink in the center and Goldrush ink in the bottom left hand corner.
I did the rolling technique on the flowers to give the graduation of color on them.
Hope you like them - Love Sara xxx

Tuesday, January 14, 2014

Cloud Nine - National Paper-crafting Month

Wooohooo - I always love the fun limited edition kits that Close TO My Heart comes out with for 
National Paper-Crafting Month  :O)
Have a look at these fun cards - all made with the items in the Kit - Birthday, Thank You, Love You, Celebrations and a Just Because card are all here. The kit will make 2 of each of the 5 designs.
Perfect for ALL occasions throughout the year - what's not to love :O)
 The kit features a lovely 2 sided patterned paper and the stamp set is Compatible with the CTMH Artiste Cricut cartridge so you will be able to use it again and again.
Don't worry if you haven't bought your cartridge - the kit does come with a sheet of pre-cut pieces for you.
And Oh - how I LOVE the new Teal Shimmer Trim and Gold Dot Washi Tape included in the kit along with Triangle adhesive Durable Studs.
Remember its only available during January - so contact me as soon as possible to order yours for just $15 (value of the kit is $46)  with a $35 qualifying order 
Love Sara xxx

Monday, January 13, 2014

Cross-Stitch Wishes - January Stamp of the Month

I wasn't sure about the January SOTM when I first saw it - not really my style BUT as you can see from all
of the cards etc that I made with it - it really IS my style :O)

This card is a great way to use scraps of cardstock, I added the Huntington Zipstrip and Bronze Shimmer Trim and added Hollyhock cardstock. Stampin the hearts in Hollyhock and Blush Ink.
I made the swirls using the new Stitch Guide and Mat and the Piercing Tool Kit.
A length of the Slate Polka Dot Ribbon adds shine. 
(Don't forget to order your ribbon - as it retires at the end of Jan14)
 This card below was designed my the talented Carolyn Johnson and then I took the idea and ran with it :O)
I added pieced holes to the scalloped edge (made with the scallop border punch)
I also made holes around the edge of the stamped large heart with the Piercing Tool and stamped the row of hearts on the cardstock. 
 I saw a small wall hanging on another ladies blog and this is my version of it.
The zip strip is from Babycakes and I attached it to a 5" sq Colonial White cardstock base.
I stamped the words in Sunset and the hearts in Sweetleaf.
I used the Color Ready seam binding ribbon to hang it up and added a Whisper cardstock back cust at 5.25"sq. Slate cardstock is the smaller grey square in the middle.
Cricut flowers finished it perfectly.
 Again - I saw the idea for a sympathy card and this is my version of it (I apologise I can't remember the site I saw it on ) I made 3 and just changed out the color of the stamped heart to show you how versatile it is.
A small matching sparkle added some shine and interest. A quick and easy card :O)
 I used Proplayer on this card and added Blush and Pear cardstock to give it a Spring feel
I sponged the Color Ready Seam Binding Ribbon with Pear ink to turn it green.
 Again I saw a card where the lady had used the arrows to make the background - so I followed her lead and then added Laughing Lola paper and cardstock. Black Shimmer Trim and Cricut flowers finished it off.
 Another card using Huntington Paper and Zip strip. I added Hollyhock again to this kit - so easy to do as there are all neutral colors in this kit - and Bronze Shimmer Trim.
Again I used the Stitch Guide, mat and Piercing Tool kits to add the fun swirls.
 As you probably know I am a great one for cutting my stamps up - either with scissors or with a craft knife. Yes you can do this too - just be very very careful not to cut in to the image.
There is no returning them to CTMH if you have altered your stamps in any way :O)
Anyway I took my Exacto knife and carefully cut around the works in the 'Sew Special' stamp and then I was able to stamp just the cross stitch rectangular border. I then stamped the small hearts in Blush and Sweetleaf to give the impression of a quilt.
 And last but not least here I have turned the hearts into flowers - Desert Sand and Lagoon go together so well - more scalloped boarders and Sparkles and Shimmer Trim add Bling :O)
Hope you have enjoyed looking at these and maybe it will give you some inspiration to make YOUR version of them.
Love Sara xxx

Saturday, January 11, 2014

Polar Bear Christmas Card

Yes I know, I am a bit late with the Christmas Card BUT with the Polar Vortex we have been suffering with over the last week and the snow and the arctic conditions - I thought this card is very apt!
I used the soon to be retired Frosted paper  along with C1557 Polar Bear Holiday.
I tore the paper and then squeezed a thin row of Liquid Applique along the ripped edges.
I sprinkled it with the now retired Prisma Glitter ( CTMH please bring it back - I'm not sure how I can live without it) and then heat set it - the Liquid Applique puffs up like popcorn and sparkles too WOOHOO :O)
Hope you like it - Love Sara xxx

Friday, January 10, 2014

Family Mini Album in a Bag

Here is another project which I submitted for Extravaganza 2013.
The base is the My Creations 6x6 Memory Showcase album.
I made the handles and the sides from Burlap Ribbon. and featured the Chantilly paper pack.
The flowers and leaves were cut using the CTMH Art Philosophy Cricut cartridge and as usual I used the Bonding Memories Glue pen and Prisma Glitter to make the flowers sparkle.
I used a Dimensional Element Heart and inked it with Desert Sand ink. I then rubbed a layer of Create a shade pearl paint over the ink and when it was dry then stamped the word LOVE from my absolutely favorite set D1482 Love Life.
I think added a layer of Liquid Glass to make it shiny. I did exactly the same process on the tiny wooden bird and used Crystal Blue ink before the paint and Liquid Glass.
I pleated the Chantilly Fabric and also added the key from the Brocade Assortment.
I also added a wooded flourish from the Wooden Mini medley which had the same treatment as the wooden bird and cut another flourish with the Cricut cartridge from the Twilight cardstock
Inside the Bag I added a collection of mini albums made from 8x5.5 cardstock bases which I folded in half to make 4x5.5 mini books.
Here I used the Cork alphabet which I added more liquid glass to and used the piercing tool to decorate the edge of the scalloped cardstock.
Here is a close up of the Dimensional Element Heart - I covered it with paper - then Prisma glitter and tucked a pleated piece of Chantilly fabric behind it.
I added Clear Sparkles to the paper at the bottom of the paper.
Here I just folded a length of Chantilly fabric and attached it at the back with liquid glass.
This little heart was inked and then I added a layer of Liquid glass and then dipped it into the Prisma Glitter.
On this lager heart I added the Chantilly paper and then a Clear Sparkle and then a layer of Liquid Glass.
This heart had the fabric attached to it - then a Sparkle and then Liquid Glass :O)
Hope you like it - Love Sara xxx

Thursday, January 09, 2014

Be still and know that I am God Prayer Box

Here is another of my Extravaganza 2013 artwork submission pieces and again I had an idea in my head and it worked out exactly as I wanted it to. 
I created this to put small prayers in it - something that I could just dip in and pull out a prayer for the day.

You would be proud of me I actually mixed 2 paper packs together which for those of you who know me well - know that that is WAAYYYY out of my comfort zone lol.
I used the CTMH My Creations Kraft Container along with the Chantilly and For Always paper packs. 
I started by rubbing a thin layer of Create a Shade Pearl paint to the container and lid to give it a shimmer.
 I made many flowers cut from 1" through to 2" and all the sizes in between from the Chantilly paper and added Clear Sparkles to the centers. I cut the leaves at 1/2" from the Sweetleaf cardstock - all of these images are found on the CTMH Art Philosophy Cricut Cartridge.
I used the Silver Shimmer Trim on both the lid and main body of the container.
I gathered the Black tulle ribbon with black waxy flax to give it the 'Tutu" feel.
Here is a close up of some of the flowers  and leaves. I used the glue pen and Prisma Glitter to add more sparkle to the project.
 I also added the Small Sparkle Clear Flourishes on the container for even more 'Bling'
 So there you have it - a sparkley, shimmery, flowery container which I absolutely love - hope you do too :O)
Love Sara xxx

Wednesday, January 08, 2014

Here we go :O)

Okay buckle up and hold on tight and I am going to bombard you with ha whole heap of artwork - will schedule it to post every day or so so as I don't overwhelm you all :O)

Tommy Scrapbooking Layout

I was so thrilled with the way this layout turned out. It was exactly as I imagined it would be in my head - and that doesn't always happen believe me !!!
This was the Southern Caribbean 2013 cruise which I earned with CTMH - one of my favorite trips ever as I snorkeled for the very first time :O)

I used the piercing tool and neutral colored bakers twine and stitched all along the edge of the 2 pages to give it a nautical rope feel.
Here you can see a close up of the embellishment cluster on the mail photo. 
 I added the journalling area underneath the title piece.
I also used a dry embossing tool and scored lines into the Cranberry Cardstock and then added embossed dots to give the feel of decking then rubbed the cardstock with the Cranberry ink to really make those embossed areas stand out.

Hope you like this layout - it was fun to make :O)
The Tommy Paper and embellishments retire at the end of January 2013 so make sure you order yours now

Love Sara xxx