Monday, November 30, 2009

Remember Memory Box


I found this cute but undecorated little box & matching concertina mini scrapbook at a scrapbook expo
a few years ago and decided to play with it. I LOVE this Stylin' paper which is unfortunately retired :O(
I still have a secret stash which I play with :O) I stamped the outside of the box base in blush ink and added black waxy flax to the blush button. A silver hinge added detail and interest to the top.

Again - much of this product is retired - the ribbon and spiral clips - but I soooo love using them. The photos show Sarah, Shelley and I at Mary Arden's Cottage in Stratford on Avon.


Although it was February and the day was bitterly cold - you can see how much fun we had together. A fabulous day with fabulous friends :O)

Hope you like it :O)

Saturday, November 28, 2009

Just 2 more days left..............

.................of Stampaganza - Close To My Heart's incredible 'buy 2 stamp sets - get one free ' deal. Have you stocked up on your most wanted sets??? Remember that many of our beautiful stamp sets will be retiring (sniff,sniff) BUT there will be lots of beautiful new designs next year (yippetty skippetty).

SO if there ares stamps you need, want, love, must have - visit my website at http://sarabatkin.myctmh.com and shop till you drop with this wonderful offer - you can view our retiring products there too. Remember that your free stamp sets will be equal or lesser in value to the ster you have bought. Happy stamp set collecting :O)

Friday, November 27, 2009

8 Reasons I know I am a Princess...............................


This was a fun mini album which I made for teaching my class at CTMH Convention last year - I used chipboard for the covers and then used the Silhouette 9x9 pages to make the pages and pockets. I used my bind it all to make the holes and this gorgeous balck floral ribbon from CTMH to tie it all together :O) Some of the stamps I used on this are now retired :O( But I think it is so much fun :O)  Hope you like it


Items used:
Close To My Heart: 9x9 Silhouette pages, Black and white floral ribbon, Sparkles, Big Pinks paper flowers, My Expressives font CD,

Thursday, November 26, 2009

3 Ring Binder Project Workshop


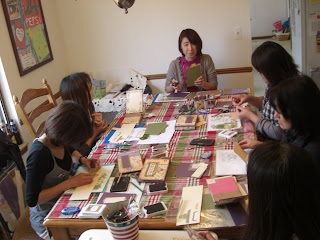
Here are a couple of photos from last weekend's workshop which I taught to my wonderful friends and customers. Here they are all hard at work as we turned the CTMH 3 Ring Binder into a 'Favorite's' Book - S few of the girls decided to do Recipes - the others were going to put photos in theirs. The possibilities are endless :O)
We had so much fun making them together.

And here is everyone with their finished books - on the back row there was Hisayo, Reiko and Maki, and at the front, Chikako (who had kindly let us use her home), Ikuko, Aiko and Shinobu..

Wednesday, November 25, 2009

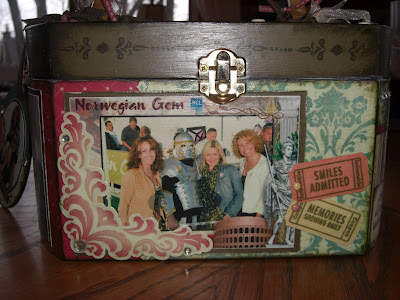
Cruise Box Purse

I have been missing in action for the last few days - and this is the reason !
I have been getting down and dirty with the Modge Podge LOL.

I wanted a cute purse to take to my gatherings which will hold my pens, calculators etc & this is what I
came up with. I LOVE the Perfect Day Level 2 paper pack and used it to decorate the outside of a wooden box and tag, which I bought from Michaels the craft store.
I added the matching stickease and then went to town with the Sparkles and ribbon and a WHOLE HEAP of ink distressing. The lid has a dimensional element bookplate and bigger brads to hold it in place and also eatures a chocolate colored rub-on border.
This photo shows Me, Mandy and Victoria with a Roman guard! We were off to spend the day touring Rome - 1st stop - the Colosseum.I love this stamp set with the tickets on it - so cute. I added the brads for some texture.

At this end of the box I added a circular stamped image and the sentiment from the stamp set
which matches this gorgeous paper. Yes and more sparkles :O)


A positive bevy of beauties :O)
Claire - my older sister is on the left,Victoria is sitting next to here - then me - and last but certainly not least - my younger sister Rachel (affectinately knows as Dora Turkey LOL). The word Memories is a rub on.
I found these architectural elements in a scrapbook store which has since closed down.


This is the other 'end' of the box with a photo of Me, Kristine, Victoria and Holly in Pompeii. It was a fabulous day full of giggles. Again the stickease and sparkles add a great element. The Tag shows a photo of Mandy Victoria and I in one of the many photos we had taken by the ships photographers.
Here is the other side of the tag - a photo of the harbor as we approached Capri - again stickease and a sparkle add a fun touch.
Products used:
Close To My Heart Products: Perfect Day Level 2 paper Pack and Stickease, Sparkles, Ribbon, Clear Tag
Cocoa, Sorbet & Creme Brulee Exclusive inks, Rub-ons in Chocolate and White Daisy, Dimensional Elements Bookplates, Spring Blossom Brads.

Misc Products: Wooden box, handle and tag from Michaels, Architectural elements.

Hope you like it - let me know :O)

Monday, November 23, 2009

Jingle Workshop To Go Cards


So finally....... the Jingle Workshop to go cards - aren't they fun :O)
As ususal I have put the 'basic' kit card on the left hand side and put the 'upgraded'
version on the right.  So cute.
I think these would make great birthday or Christmas cards.
The basic kit coming with the adorable twinkle brads and the upgraded cards have the ribbon and the dimension elements added to them.
I apologise if the bottom photo is a little blurry :O(

Today is my baby girls birthday

Well she will always be my baby girl. She is 22 today - it only seems such a short time since she was a little one in my arms - the time seems to have flown by. So Happy Birthday Robyn :O)

Friday, November 20, 2009

Key To My Heart Memory Showcase Box

Here is a Memory Showcase box which I made some time ago - I LOVE this paper - absolutely beautiful and it is such a shame that it is no longer available :O( But I thought I would share it anyway. I added Sorbet and Cocoa exclusive inks and used a Sorbet Exclusive Marker to color in the edges. I find, when I make these boxes, that it is easier to cut the paper and cardstock slightly smaller than the actual box and use markers and ink pads to distress the box itself. The flower at the top of the journalling area is actually 3 hearts and then embellished with cocoa ribbon.
Again I used the hearts and layered them at the edge of the title piece and used 3D foam squares to give dimension. Again Cocoa ribbon adds texture.
On this side panel of the box I embossed the key in Silver Embossing powder on a separate piece of cardstock and then cut it out and added it so that it looks like it is about to go into the key hole :O)

Wednesday, November 18, 2009

Capri


Here I used a Perfect Day level 1 kit and added ribbon and then added circle window charms over the level 1 stickease. I also used the letters to type the word Capri.

Tuesday, November 17, 2009

9x9 Memory Showcase Travel Box


Here is another fun box which I made using the Route 66 Level 2 paper pack and matching My Stickease - I made the tire tracks on the title by running one of my sons mini monster trucks over my Desert Sand exclusive ink pad and then running across the cardstock - a fun look.

Here are the contents of the box - all needed to stop my 2 boys from killing each other on a long road trip :O)
I added more cardstock and paper to the front of some of the items in the box to make them match - the boys were thrilled with this :O)

9x9 Memory showcase box and album

Here is a 9x9 Memory showcase box and album which I made of my daughter Robyn's senior year in the Walled Lake Central Marching Band
This shows the top of the box - I used the Game on paper and black organdy and twill ribbon to decorate. Loved using the silver hinge as a detail. The word 'Laugh' is one of the CTMH rub-ons. I added Sunflower cardstock as this is one of the WLCHS colors.


This shows the front of the matching 9x9 album - the largest circle on the tag is white cardstock which I have heavily embossed using the gold embossing powder. A photo hanger and more ribbon adds extra dimension as does the photo clip. The words were typed using the CTMH 'Expressives' font CD.


I used the Dimensional Element letters covered in the Game on B&T for the letter W of work and embossed the word Hard - again using Gold embossing powder. I did the same thing for the Dimensional Element arrows.
This is the last page of the album - I did add ribbon to it to make 'hinges' so that it opened like a book.
I hid the journalling under the words 'Play hard' and attached hinges to the title to make it open.

Monday, November 16, 2009

Sitting quietly

I am sitting here by my Christmas tree - the house is all quiet - everyone is asleep - yes even the dogs - I can hear Yogi snoring from here ! I have caught up with most of my emails, input 6 orders, processed credit cards until my eyes have crossed. But I am done.
It has been a crazy 8 days and it is going to get crazier yet as I am working every day and some evenings until Saturday afternoon. I have made the decision to spend Sunday 22nd (my day off) in my pajamas in front of the TV doing absolutely NOTHING !
Well........ that probably won't happen because my paper and stamps will be nearby and I may just do some more of my Cruise album scrapbooking. I have filled the 1st album and have started on album number 2! Soooo much fun to be shared with you all.
Well I am about to call it a day and head off to bed myself - sleep well everyone and God bless x

Saturday, November 14, 2009

Perfect Day My Crations Cube


This is a fun workshop which I taught some months ago,  using the My Creations Cube and the Perfect Day level 2 paper pack and stickease. I had seen a similar project taught by Sherri Tozzi, I loved what she had done so I took her idea and put my own spin on it.
We created a flap out of cardsotck to make a box instead of sealing it up as a cube and added photo hangers to attach the ribbon. Tags in the pocket on the side give more space to photo's or journaling.
I was thrilled how it turned out - hope you like it too :O)

Friday, November 13, 2009

Lisa's card and gift bag

A day or so ago I posted the mini allsorts album I had made for my dear friend Lisa - so here are the card and matching gift bag. I love the stair step cards - you can add so much embellishment to it - here I added dimensional element numbers, ribbons, a button with a paper flower and brad and the matching stickease to the Notebook paper.
 
This cute bag started life as a plain white one! I added the large pieces of cardstock and notebook level 2 paper and stamped the coffee stain stamp. Then I added the center panel with her name with mini sparkles and a circle clip. The Big pink paper flower has a circle of paper in the center over which I have added a circle window charm. Ribbon is added to the handle and the tissue papar again is stamped with the coffee cup stain stamp. Hope you like it :O)

Tuesday, November 10, 2009

Lisa's album part 2


SO here are the last pages of Lisa's birthday album - you can see that I created fold out pages and flaps and tags to add extra photos - and yes - more BLING! I loved the way it turned out - and so did she :O)

Lisa's 40th Birthday Album part 1


My dear friend Lisa celebrated her 40th birthday last month so here is the CTMH allsorts album - decorated with the Notebook Level 2 paper and matching stickease. I then went to town with the coffee stain stamp and embellishments.

Monday, November 09, 2009

November Stamp of the month additional artwork - thanks to everyone who inspired me to make these.


Here are 5 more cards which feature the house set - Around the Block - the November Stamp of the Month.
The top card was inspired by Karen Pederson and is meant to be a gingerbread house - I have embossed in white embossing powder and added white daisy ink for the brickwork.
The next card is inspired by Kimberly Simmons - I loved her idea of turning the house into the outline of a baby bottle and using the roof and the feeding part. i used blush ink and cardstock and again used the dry embossing technique with ink distressing. the swirl and the tiny heart were stamped in cocoa ink on the cocoa cardstock
The tiny little tag was an idea that Michele Gamble shared and shows how to stamp the flower baskets - mask them and then stamp the windows.
The Welcome to the Neigborhood card I think was an idea by Helen Olunek (my sincere apologies if this is wrong - please correct me and I will adjust)
And the last card was based on an idea by AnnMarie McLain - who used a white background for the card she made - I took her idea and ran! - Yes it is the roof that becomes the beach unbrella. I then took a small piece of cardstock and trimmed it to make the fringe -
Hope you like them and thanks once again to the talented ladies who inspired me to make these :O)

November Projects


Here are the 2 cards I am teaching this month. The tall card features the Stamp of the month for November - I love it and uses the Grace level 2 paper pack. We are using the co-ordinating markers and inks and prisma glitter for the windows. How cute is this!
The stocking card features ink distressed dry embossed cardstock - a fun technique you are going to learn.
Again Prisma glitter on the top of the stocking adds some extra Bling!

Sunday, November 08, 2009

The Christmas Tree


Yes - I am officially completely into the Christmas spirit - I put the Christmas tree up on Friday night as - at this point I don't have another day off work until November 22nd - going to be a long haul but so worth it.

I love me tree - all red and white and silver and sparkley :O) Hope you like it too X

Saturday, November 07, 2009

Christmas has arrived early

Yes I know I haven't posted in a day or so - but I have been super busy and yesterday I decided to put up the Christmas tree. Yes I know it is only November 7th but if I didn't do it this weekend I would run out of time before the end of November as I only have 2 days off from the beginning of November until Nov 23rd! Crazy as usual LOL :O)

Anyway as soon as I find the camera I will post of photo of it - it looks gorgeous :O)

Monday, November 02, 2009

Leaving Pompeii


Here you can see that the excavations are still carrying on - even after all of this time. We had a great morning here and then headed to Sorrento.