Tuesday, September 20, 2011

September Class Projects

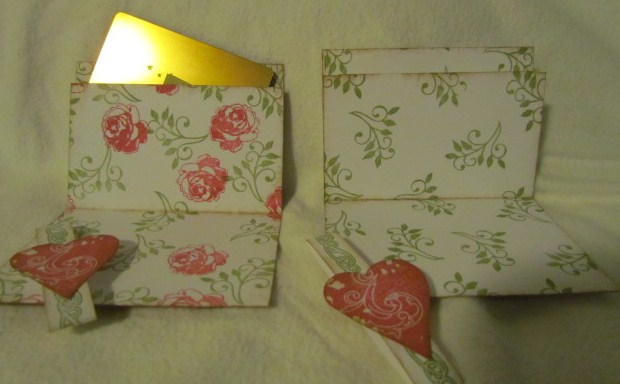
 Here is a fun little card which we are making this month using the Roxie WOTG papers and stamp set and the September Stamp of the Month - Limited Edition. 
The band comes off the card to reveal a gift card inside - perfect for teachers or how about a 
Toys R Us card  for a child, a movie theater gift card for a teenager, a gas card for someone 
who has just passed their driving test. 
Decorate it to suit the occasion. The base of the card is 11 x 4.25 scored at 3", 5.5" and at 8" - t
he card is then cut (to fit which ever gift card you have) along the 5.5" score line. 
Fold it so it looks like a W then pt a line of glue to stick the 2 bottom points together.
Hope you like it :O)

Monday, September 19, 2011

Roxie Workshop On The Go - Scrapbook-in-a-box.

So here is the Scrapbook-in-a-box I made using the Roxie WOTG with its beautiful paper, stamps and embellishments - I added a little 3D tape but nothing else.
The paper pieces for the  lid are:
Lid 12x12 Black cardstock, 
4 x 4 Smoothie Rose B&T, 
1.75 x 1.75 Zebra B&T, 
1.25 x 1.25 Leopard B&T, 
4 pieces 1.75 x 4 Swirl B&T,

The Smoothie layer is a 12 x 12 piece which is scored at 4" from each edge
The Smoothie layer on the outside has:
2 pieces 3.75 x 3.75 Colonial White cardstock - random stamped
2 pieces 3.75 x 3.75 Plaid B&T
The inside of the smoothie layer is as follows:
2 pieces 3.75 x 3.75 Colonial White cardstock - random stamped
2 pieces 2 x 2 Desert Sand cardstock
2 pieces 1.75 x1.75 Colonial White cardstock
2 pieces 4 x 2 Desert Sand cardstock
2 pieces 4 x 1 Canvas design B&T
2 pieces 1.75 x 2  Colonial white cardstock - heavily inked with Cocoa ink.

The Black Layer is 11.75 x 11.75 piece which is scored at 4" from each edge
Outside of the Black layer:
2 pieces 3.75 x 3.50 Zebra B&T
2 pieces 3.75 x 3.50 Smoothie Rose B&T
Inside of the Black layer is as follows:
2 Pieces 3.75 x .50 "Bling" zip strip
2 Pieces 3.75 x 1/75 Canvas B&T
2 Pieces 1.50 x 2 Plaid B&T
2 Pieces 1.25 x 1.75 Colonial White - stamped
2 Pieces 1.50 x 3.75 Zebra B&T
2 Pieces 3.75 x .50 "Words" zip strip
2 Pieces 3.75 x .75 Colonial White cardstock

The Desert Sand layer is 11.50 x 11.50 piece which is scored at 4" from each edge
The outside of the Desert Sand Layers is as follows:
2 Pieces 3.75 x 3.25 Canvas B&T
2 Pieces 3.75 x 3.25 Colonial White cardstock - random stamped
2 Pieces 4 x 1.75 Zebra B&T
6 Pieces 1.25 x 1.25 Colonial White Cardstock - stamped
2 Pieces 3.75 x 1 5/8 Plaid B&T
2 Pieces 3.75 x 1 5/8 Smoothie Rose B&T
2 Pieces 1.50 x 2.75 Desert Sand cardstock
2 Pieces 1x 2.25 Cream Cardstock

The Smoothie layer is 11.25 x 11.25 piece which is scored at 4" from each edge
The outside of the smallest Smoothie Layer is as follows:
2 Pieces 3.75 x 3 Floral B&T
2 Pieces 3.75 x 3 Zebra B&T 
2 Pieces 4 x 1.50 Zebra B&T
2 Pieces 2.50 x 2.50 Colonial White cardstock - stamped

2 Pieces 3 x 1.50 Plaid B&T
2 Pieces 3.25 x 1 Colonial White cardstock
2 Pieces1.75 x 1.75 Desert Sand cardstock
2 Pieces 1.25 x 1.25 Colonial White cardstock

Center piece 3x3 Swirl B&T
This photo shows you how all of the layers open - so this box will hold up to 32 photos/journalling sections.

Use the buttons, pins and black hemp included in the kit to decorate and add a little 3D tape under some of the sections to add interest.

Scoring & Cutting Guide below:
SO here is how you score each of the layers. They are ALL scored at 4" in from each of the 4 sides of the paper (as marked in black) Then each piece is cut from the edge to the score line (4" long cut).
These pieces fold over and become each section.
Now on the smaller layers you will have to trim these flaps as when you fold them over they will be too wide.
On the 11.75 sq layer (black cardstock)- you will have to trim .25 off each flap
On the 11.50 sq layer (Desert Sand cardstock) you will have to trim off .50 from each flap
and on the 11.25 sq layer (smoothie cardstock) you will have to trim off .75 from each flap.

Hope this makes some sort of sense and I would love to read your comments (if you like it LOL) x


Wednesday, September 14, 2011

What a lovely surprise to come home from work to :O)


Thank you so much to Tamytha ( you can find her cute blog here http://www.paperheartist.com) who awarded me the very cute Liebster Blog award. 


Liebster is German for "favorite" or "beloved".  So essentially it translates into "Favorite Blog".  The award is sent to blogs that have fewer than 200 followers.  It recognizes the "little blogs" out there and helps to draw more followers...something every blogger wants.


There is a caveat to this award - I have to pass it on to 5 blogs that I follow. 5???? Seriously??? I have so many blogs which I pop into see, where I 'oooohh and aaahhhh' over the artwork.  I do try to leave comments on the items I have looked as I know how much it means when someone takes the time and trouble to leave a comment or message - it is gratefully received believe me. 


So here are the blogs I follow and why:


http://paperpleatsandribbonroses.blogspot.com/   Connie's blog blows me away - her ribbon flowers and artwork are to die for. I wish I lived nearer to her so that I could stalk her. LOL :O) She at this point is probably very glad I don't !!!  Check out her gorgeous creations :O)


http://tuttonstreasures.blogspot.com/  Angela's blog is another site which I love to look through - such pretty artwork.


http://paigespaperparadise.blogspot.com/   Paige has a beautiful mini scrapbook - just perfect for little ones which is just one of the cute things she has made.


http://bowlofstamps.blogspot.com/     Kathleen's blog is lovely - again what fun artwork she has :O)


http://createwithbeckie.blogspot.com/   And last but certainly not least my friend Beckie's artwork is well worth a long look at. My fellow cruise earner is super artistic. :O)


SO hope you like the blogs I have mentioned.  I wish I hadn't had the restrictions of only 5 blogs which had under 200 followers.  Make sure you follow these ladies blogs and leave them comments - I know they will appreciate all you have to say :O)

Monday, September 12, 2011

My Creations Memory Game Jigsaw

I was given the new My Creations Memory game boxes to 'play' with for Conventions,
so one of the items I made was this fun Jigsaw puzzle.
I had 2 photos printed - a small one to go onto the top of the box and then a large one 12 x 18".
The large photo was cut into 24 pieces each measuring 3x3".
I inked all of the edges of the pieces and attached the photos to the front with a thin layer of liquid glass.
I used the Elemental paper pack on the box and added some of the new Cranberry Ribbon
for a textural feel on the lid.
Hope you like it :O)

Thursday, September 01, 2011

The 'Banner' Christmas Tree

Here is one of the pieces of artwork which I made for this years Extravaganza class.
It is a Christmas Tree made from 2 sets of the Banner pieces. 
The trunk is covered with cocoa cardstock which I dry-brushed with cocoa re-inker to make it 
look like bark - the paper is from the Lucky level 2 paper pack. I heat embossed the snowflakes 
on alternate pieces of the paper.
I used the Dimensional Elements Ornaments and lots of liquid glass !  
The pieces were tied together with cocoa ribbon and the the whole thing was decorated with the gorgeous roses ribbon from the Pink collection.
Hope you love it as much I do:O)